How to Build a Bait Pen for Fishing
It is important to keep bait in a safe place until it is ready to be used for fishing. Building a bait pen is a possible option, although the task is not quite simple. You will have to take some precise measurements. Here is what you will need to build a bait pen for fishing.
Things Required:
– 1/2-inch hard mesh, one 3 foot by 15 foot roll
– 2 pool noodles
– Four 3/9-inch flex conduits, 8 inches long
– Two 3/8-inch T-fittings
– Two 3/8-inch 90-degree elbows
– Four 3/8-inch end splices
– Wire cutters
– Silicone glue
– 30 zip ties
– Measuring tape


Instructions
-
1
You will need one 9-foot and two 3-foot sections of mesh. Four 4½ -feet, two 3-foot 1-inch and three 1-foot sections of flex conduit will also be required. Carefully measure both mesh and flex conduit according to the given measurements with a measuring tape. Cut the mesh and flex conduit into appropriate sections as you measure them.
-
2
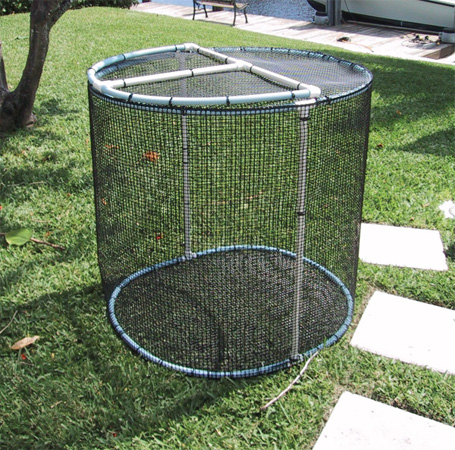
You now have to make the top and bottom rings of the bait pen. You will need to utilise the four 4½ -feet flex conduit sections that you prepared in the earlier step for this purpose. Bend two flex conduit sections into semicircles and connect them to each other with end splices. This will serve as the top ring. Make the bottom ring in a similar manner. Make sure that you apply silicone at the point where you attached end splices and allow time for the silicone to dry completely before moving on to the next step.
-
3
The mesh sections that you prepared in the first step now need to be attached to the top and bottom rings. The 9 foot mesh section runs all the way from top to bottom in between the rings. Use zip ties to secure attach the 9 foot mesh section to the rings. One of the 3 foot mesh section has to be attached at the top whereas the other 3 foot mesh section will go at the bottom of the pen. As before, secure that mesh sections with zip ties. Use a pair of wire cutters to trim off any excess mesh that may be hanging loose on the edges of the rings.
-
4
Adding a door to the fish pen comes next. Make use of the three 1-foot conduit flex sections that you prepared in the first step. Place the three sections in a T shape and secure the sections in place using a T fitting. On the outside of each of the horizontal sections, put an L shaped elbow. For the vertical conduit flex section, use a T fitting at the bottom. Apply silicon from a silicone gun to all the connections that you just made and allow time for the silicone to dry completely before moving on.
-
5
Use a pair of wire cutters to cut the door opening into the top mesh section. Make sure that you keep the opening smaller that the door. This is important to ensure that the door does not fall in the pen. Once the opening has been cut, cover it with the door and attach the horizontal side to the mesh. Use more zip ties for this purpose.
-
6
Finally, connect the two pool noodles around the pen by bending the noodles into semi circles. The noodles may require some resizing before they can grip the pen properly. Install a few zip ties along the length of the noodles in order to keep them attached to the mesh.


