How to Build Your Own Computer
Building your own personal computer is not a big deal if you follow a proper procedure and have a little know how of how a computer works and its basic components. A simple practice can make you a master in building personal computers. All you need is computer knowledge, and the parts you want to assemble together. It does not take much time and allows you to build a flexible machine according to your desired specs. The best part is that the custom built personal computer can be upgraded any time and you can make it flexible for different uses like gaming, multimedia or designing purposes. If you don’t know how to make your own computer then read our step by step guide below to learn this art.


Instructions
-
1
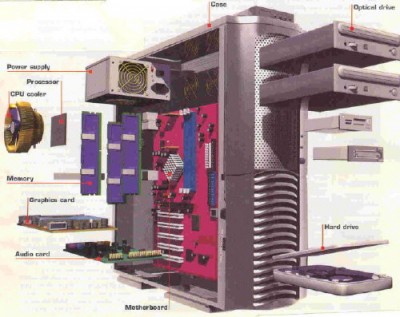
Preparing the computer case
The very first thing you will need is an empty computer case that can hold all the PC parts together. Choose your favourite design for the casing and remove the cover from it. You will need to remove some screws from the back of the case in order to remove the cover.
There are some cases available in the market that have screw-less designs and the covers can be removed simply by releasing some clips. Take a blower or moisturized rag to clean the case from inside.
If your case came with an I/O shield without a motherboard installed in it, then remove the I/O shield to allow space for the motherboard. Some of the cases come with pre-installed power supply. If your case did not come with a power supply then install one inside the case by properly aligning the fans at the rear of the case and point the wires towards the front. Screw the power supply to fix it properly inside. There should be a knob for voltage mentioned on the power supply, set it properly according to your country’s standards. -
2
Motherboard installation
Remove the protective coating from the motherboard and if it did not come with a processor then you will need to install a processor first. Installing the processor is a tricky part; insert it at proper orientation by opening the socket to a vertical lay out, line up pin 1's location of the processor with the pin 1 location of the motherboard. Close the sockets to finish this process.
Now you have to install the heat sink and CPU fan as they work as a cooling unit of your processor. Install it by making use of heat sink compound. Now attach the power input wires of cooling unit to the power supply.
Now you have to install the memory sticks; you can locate the long distinctive memory sticks location on your motherboard easily. Simply line up the memory sticks into sockets by making use of the notch and the plastic bridge, and lock the RAMs once they are aligned accurately.
Now is the time to connect the motherboard to the case. Turn the case on its side and then place the motherboard on the mounting plate, tight the screws and make sure the I/O unit of your motherboard is properly aligned at its place on the back of the case.
Now connect the fan and the mother board to the power supply and make sure that you have installed the connections of power and restart button. -
3
Drives and other components installation
Now install the hard drive, floppy drive and CD drive that you will be using by aligning them in the drive bays inside the case by making use of the screws provided.
Now connect all the drives with the motherboard by making use of IDE cables provided with the drives. Now connect the drives with the power supply by making use of power chords attached to the drives.
If you have to install a video card, network card or a sound card, install it on the mother board into the special slots allocated for these types of devices. If you are using a sound card then it might need a connection with a CD/DVD drive as well.
Make a thorough check of all of the connections and devices you installed. Once you are satisfied, close the case by attaching the case cover. -
4
Testing
Now connect your computer to your monitor, mouse, keyboard or any other input output devices by making use of the I/O peripherals of your motherboard. Attach the power cable to the CPU and turn it on.
Setup the bios option by striking, Del, F9, or F10 key (they could vary depending on the bios versions). Confirm the boot orders and video configurations by exploring the bios. Make sure that the CD/DVD drive is selected as the first boot device.
Insert windows CD/DVD inside the drive and restart your computer, now you will be able to see the windows installation instructions on screen. Follow the on screen instructions to install the operating system.
Once you are done with the installation, test the computer and install all the necessary drivers by making use of the CDs/DVDs provided with the components.