How to Install a Deadbolt Lock
Locks are essential for protecting your property. However, the simpler locks are sometimes easy to open and won’t keep your property secure. You cannot trust the simpler or puny locks. Therefore, install Deadbolt Locks for added security and to be truly safe from any kind of robbery or other mishaps. You can install Deadbolt Locks or can replace the simpler ones with it. This does not mean you have to call any locksmith as you can install it yourself. Deadbolt locks are easily available in the market and are inexpensive. Most of them come with a cardboard template, containing the instructions to bore the latch-bolt holes along with the cylinder.
Things you will need to install Deadbolt Lock:
– Deadbolt Lock package
– Deadbolt Lock Template
– Hammer
– Masking tape
– Marker or lead pencil
– Hole-saw
– Affix 1-inch spade
– 1-inch chisel prickly
– Chisel blade
– Mounting screws
– Spade bit
– Strike plate


Instructions
-
1
Positioning
Mark a spot at 44 inches above the bottom of a door, using a measuring tape.
-
2
Affix the template to the door
Use a masking tape to attach the lock’s template to the selected spot
-
3
Mark the center of the holes
Use a marker or lead pencil to mark the centers of the holes for both the latch-bolt (into the edge of the door) and the lock’s cylinder (through the face of the door).
-
4
Bore the hole for the lock cylinder
Attach a hole-saw to a standard drill and use it to bore a medium hole through the marked position of the face of the door.
-
5
Bore a hole for the latch-bolt
Affix 1-inch spade bit to the standard drill and bore a hole for latch-bolt at the edge of the door.
-
6
Cut a recess to install latch-bolt mortise
Use a hammer and 1-inch chisel prickly chisel to cut a recess above the Latch-bolt hole. It will be used to install the latch-bolt mortise.
-
7
Position the latch-bolt face-plate
Now place the latch-bolt faceplate flush in the recessed frame of the door and smooth the wood, using a chisel blade.
-
8
Install the latch-bolt faceplate
Use two mounting screws to fix up the latch-bolt faceplate to the recessed corner of the door.
-
9
Push the keyed portion of the lock through latch-bolt’s hole
Once you install the latch-bolt, gently thrust the keyed portion of your lock into the latch-bolt’s hole. It helps in extending the tailpiece through the latch-bolt’s hole.
-
10
Fix the inner side of cylinder
Now, fiddle with the inner side of the Lock’s cylinder in order to line up the screw holes with the external portion of the Deadbolt Lock.
-
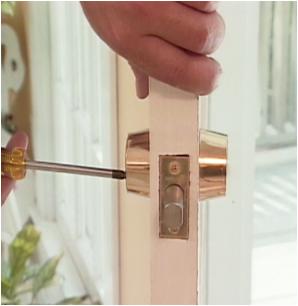
11
Fix the two sides of the lock
Use two medium sized retaining screws to fix the two sides of the lock, holding it in right place.
-
12
Mark the doorjamb
Close the specific door and use a marker to mark the exact spot on the doorjamb - where the latch-bolt touches the door jamb.
-
13
Trace the marked spot
Grab a sharp strike-plate and use it as a template to cut a mortise on the door-jamb’s market spot, as shown in the image. Use sharp chisel for tracing and slashing a mortise.
-
14
Bore a latch-bolt hole
Drill a medium hole right in the center of the mortised surface, using a spade bit. It helps the latch-bolt to enter into the lock.
-
15
Set up the strike plate
Use two screws to fix the strike plate of the Deadbolt Lock.
-
16
Test the lock
Close the door and check out the installed Deadbolt Lock. Loosen the installed screws and fix up the lock until the latch-bolt slides smoothly into the hole.


