How to Install a Garage Door Opener
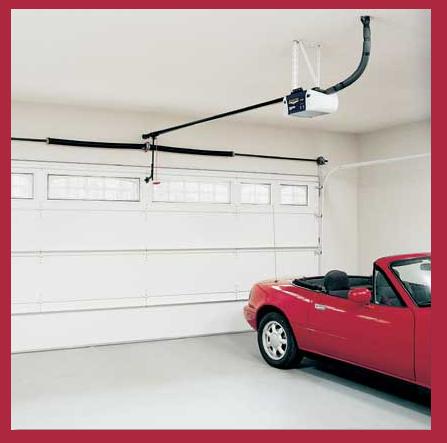
Garage door opener allows you to open the garage door also keeps warmth away and protects your cars or motors from unhealthy environmental effects. If you find your door opener broken or unfixed, then you need to install a new garage door opener. Take this write as a guideline and replace your garage door opener, without wasting your precious time and resources.
Materials Required
– Garage door opener
– Hanger brackets (usually provided with the unit)
Tools Required
– Hammer
– Screwdrivers
– Adjustable wrench
– Socket wrenches
– Tape measure
– Drill/driver
– Level
– Ladder


Instructions
-
1
Parts Formation for Assembly
Arrange all parts in assemble order. The extended sectional track may be on all sides of tubing or an aluminum canal, and on few units it is decisive that the pieces be mated so that each end faces exact track.
Next on screw-drive units, each screw section is combined with the track. You need to pay attention on all installation instructions. Attach the exact each end of track with the motor housing then check if all fasteners are cozy or not?

-
2
Assemble the Track
Join ‘Up’ & ‘Down’ limit switches as well as their low voltage wiring to the track with suitable points. Take measurements from motor end and door end and then locate the estimated rough point of switches as per the directions of manufacturer. Next attach the door lifting carriage and fix it on the emergency release cord and handle. -
3
Chain or Tape Assembly
Now let’s come towards assemble chain. Fix the nylon or chain tape with traveler with the help of snap faster/master link, then wrap up the chain or tape all around the motor drive sprocket and hook its free end with the cable that is already extended till the end of the path and back to the traveler. Exactly this cable goes around a free spooling idler pulley mounted to the track’s header set creating a constant loop.

-
4
Door Hardware
Next, fix your assembled door opener at sideways and then stir the door itself. Shut the garage door and then measure it from middle and mark a center-line on top of the door and on wall over the door opening. After doing so you need to use a level in order to extend this center-line upward minimum one foot bigger than the door. -
5
Door and Track Support Hardware Installation
Smoothly lift the door until you can conclude its maximum point of travel as its rotation is upward. Next measure this maximum point from the floor and then convey the measurement to your center-line marked on the wall over the door. Adding 2 to 2 ½ inches is recommended by the door opener manufacturers. Now you need to check your instructions. Mark this point over your center-line and after that install the header bracket. Now take few of insulate screws that creep into the wood framing. Make sure that bracket is parallel with the center-line and the marked door’s maximum travel point.
In case your garage door is of horizontal assist spring fastened with the wall heaver above your door, and it’s on your final measurement way, then you have the option to frequently extend the center-line above the spring as well as mount of the bracket. If you find that point over the wall header then you might need to install 2x4 or 2x6 cleat around and minimum of 2 wall studs, for providing a solid anchor point to the door’s header bracket. -
6
Motor Unit Installation
Coming next on motor hanging, hold up the motor end of the door opener and boost the free end of the track near the header bracket, and then attach the track with bracket, afterwards raise motor in anticipation of the track is just about horizontal. Momentarily support the unit in place as you gradually open the garage door, ensuring that the door has sufficient clearance under the track. Now, fix the rising brackets provided with the unit. If your garage has a refined ceiling, make sure to fasten the growing straps to the wood framing, and not to the drywall alone; the motor should be heavy, and it produces significant torque when lifting the door. If you feel it essential, install a 2x4 cleat across the ceiling joints to offer anchor point.

-
7
Door Attachment
Fix the door bracket near with top of the garage door, on your center-line with the help of blots trough door. (After the setting up, if the door's top rim bows inward as it is pulled up by the motor, support it with position iron.) Accumulate the door arm, and then attach the bowed end to the door bracket and the instantly arm to the opener's carriage. Alter the arm's length so that it is virtually vertical when the carriage is stopped at its frontward limit. -
8
Safety Devices Installation and Testing
Available auto garage door openers are not all satisfactory nowadays. For that purpose you need to test it through proper channel. A classic safety device projects an "electric eye" beam across the door's path, about 6-inches. off the floor. If any entity interrupts this beam despite the fact that the door is closing, the motor instantly reverses and raises the door.
Accumulate the electric eye sending and receiving units reverse one another on every side of the door opening. They need to be aimed directly at each other, and sited so that nothing will get in the way with the beam as the door raises and lowers. Low voltage wiring running from each unit to mortal screws on the door opener's motor aiming the component to a wall switch located near the door. Check the sensors by temporarily jamming the beam as the door operates.
The gate should also at once stop and reverse when it encounters any solid entity. Trial this by placing a cardboard box underneath door as it closes. If the door does not stop and undo, regulate it by moving the Down limit switch. A number of units have force alteration settings located on the motor.


Tools Required
- Hammer
- Screwdrivers
- Adjustable wrench
- Socket wrenches
- Tape measure
- Drill/driver
- Level
- LadderNext%20stop%3A%20Pinterest "Pin It")


