How to Install Closet Shelf and Rod
Closets are meant to organize things in one place. When it comes to a closet where you keep your clothes then it must be build in such a way that every kind of clothe can be accommodated. In this regard a closet with a shelf and rod is not only an excellent way to utilize space but also makes it possible to hang those clothes that can not be folded like your jackets or coats.
Now if you are planning to install a closet shelf and a rod then there is no need to hire professionals for this as we will guide you how you can do it on your own.
Read the guide below on how to install closet shelf and rod and build your closet in your own style.
Things Required:
– Hardwood boards
– Nails
– Foot Ruler
– Screw driver
– Screws
– Tape Measure
– Pencil
– Notepad
– Angle Bracket
– Closet Rod and sockets


Instructions
-
1
Marking Points of installation:
Our first step is to mark the line of installation and in this regard we will first identify the points where the shelf will be installed. Now with the help of foot ruler, we will draw the line ¾ inches below the points marked in order to leave some room for the thickness allowance.
-
2
Taking Measurements:
Now with the help of a measuring tape, take measurements of the shelf size which includes its length, width and height. Don’t forget to note these measurements down in your note pad.

-
3
Cutting:
Get a wooden board cut from the carpenters shop. Give him all the instructions about the size by giving him the measurements you have just taken. Ask him to cut a shelf of desired shape and also the supporting strips of size 1x2. Also ask him to cut the closet rod with 1/8 inches less then the actual distance between the two adjacent walls of the closet.
-
4
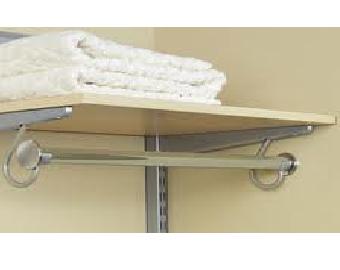
Installing the Closet Shelf:
Now comes the phase of installing the closet shelf.
So first nail the supporting strips on the side walls and the back wall by positioning the strips top on the line you drew.
Now that the supporting strips are nailed, you can now install the angle bracket for support. Position the angle bracket in the middle of the back wall and groove the screws into it.
Now is the time to install the shelf so fix the shelf on the side strips and angle bracket. After fixing screw the shelf into the supporting strips and the angle bracket.
-
5
Installing the Closet Rod:
Next screw in the closet rod socket into one of the side strips by positioning it exactly in the middle of it. After this insert the rod into the closet by positioning it on the installed socket. Finally install the other side of the closet rod by positioning the other pole on the socket and then screwing the socket into the other side strip.


