How to Make a Polk-a-Dot Pumpkin
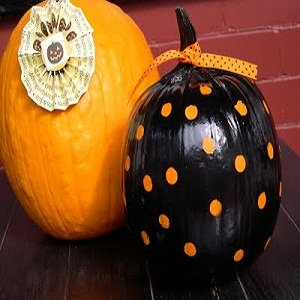
Think of Halloween and the first image that comes to most minds is of decorated pumpkins. Halloweens are incomplete without pumpkin decorations. Pumpkins have a round and cute shape that makes them ideal for a number of creative ideas. It is also easy to carve and paint on them. Above all, they are very inexpensive and are easily available. The classic polka dots look as good on pumpkins as they do on your pajamas, your mug or any other surface. If you are looking to paint a few pumpkins, try the polk-a-dot pattern.
Things Required:
– Pumpkin
– Black spray paint
– Circular stickers
– Paint of any colour for the dots


Instructions
-
1
Clean your pumpkin well. Use an old rag to clean the surface so that it is clear of impurities and ready to be painted on. Place the pumpkin on a flat surface, preferably with a newspaper spread under it.
-
2
Place the circular stickers on the pumpkin in a random pattern. The size of the stickers depends on your preference and availability. The primary job of the stickers is to protect the surface under them from the black spray paint.
-
3
Now spray paint the pumpkin thoroughly. Cover the entire surface completely with the black paint. If you do not want a black background for the polka dots, you can use any colour of your choice according to the theme of your event. However, black and orange is the most common theme at Halloween.
-
4
After the spray is dry, take off the stickers carefully. You will notice that the area under them is clear of any paint. Since a pumpkin's natural colour is orange, you can leave it like this here. However, you can enhance the colour by painting a dark shade of orange over the circles. Let the pumpkin dry well before putting it up as a décor.
-
5
A creative addition to the project will be to turn the pumpkin into a light house. Cut the top of the pumpkin neatly. Keep the top with you and drill holes in the circles that were made by the stickers using a drill with a ¾ inch drill bit. Place a tea light candle inside the pumpkin and replace the top to contain the light. When the candle inside the pumpkin is lit, the holes will give off the light and present an impressive sight. You will have to replace the candle when it burns out. Battery operated lights can also be used for this.


