How to Make a Ribbon Pinboard
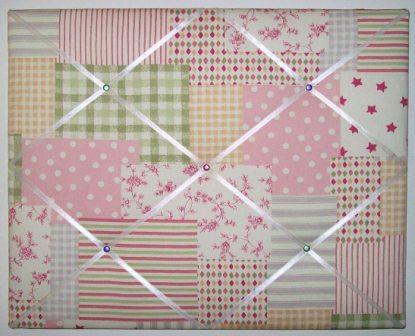
Ribbon pinboard allows you to display your photos in a stylish and interactive way. Moreover, it can also be used for decoration of your room, TV lounge or any other place. These pinboards are easily available off the shelf, but if you don’t want to buy it from the market, you can make one of your own at home. All you need is to procure fabric and ribbon of your choice and some other accessories to make it.
Things Required:
– Cork board
– Straight pins
– Fabric the same size as the cork board, and 2 inches around
– Batting the same size as the fabric, minus 2 inches around
– Double-sided carpet tape
– Spray adhesive
– Scissors
– Ribbon
– Staple gun


Instructions
-
1
Take the fabric and place it on some clean and flat surface. Your fabric must be face down.
-
2
Tape the double-sided carpet tape around each side of your fabric. Make sure that you put the tape in a right way, otherwise it will create problem for you afterwards.
-
3
Spray a very light smog on the centre of the fabric. Place the batting in the centre of the fabric and press it on the spray adhesive. Please keep in mind that the batting should not overlap on the carpet tape on the fabric.
-
4
Take your cork board and place it on the top of the fabric and batting. In order to fit the cork board properly, you have to centre it perfectly on the batting.
-
5
Now, you have to mitre the corners of the fabric with the help of scissors in order to keep a gap of around 1/3 inch between the corners of the cork board and the fabric. Please make sure that you keep a gap of at least 1/3 inch because otherwise the material will not be enough to fit around the corners.
-
6
You have to pull the top edge of your fabric over the cork board. Then, push it gently on the fabric in order to make sure that the tape is firmly stuck on the board. After that, pull it over the board and push it again to ensure that the tape adheres to it.
-
7
Pull both the sides of the fabric over the board after folding the mitre corners. Now, make an ‘X’ on the board with two pieces of ribbons of your own choice. Insert pins on the ribbon ends and your board is ready.


