How to Make Safety Pin Bracelet
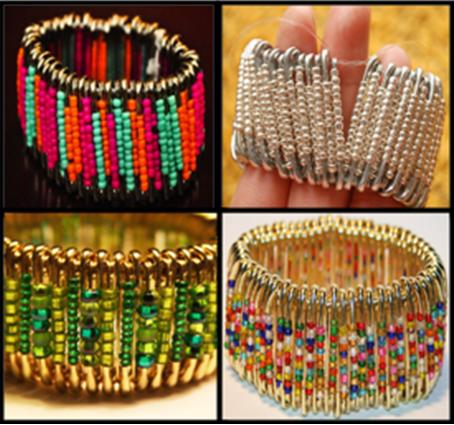
If you are fond of arts and crafts, you should definitely try making your own safety pin bracelet. It is a very easy and inexpensive project that you can accomplish in a short period of time without any special tools or skills. The eye-catching safety pin bracelet looks fabulous around your wrist. You can make experiment with the types and colors of beads to come up with colorful and funky safety-pin bracelets. Moreover, this simple project allows creativity in developing various designs or patterns. You can wear the bracelets yourself or can present to your friends as a gift as well.
Follow this simple guide of step by step in order to learn how to make safety pin bracelet:
Things you will need to make safety pin bracelet:
– Silver or golden safety pins of the same size (about 85)
– Small beads of your favorite colors
– Sheering elastic
– Scissors – the sharper the better
– Bead tray or some other container to hold beads
– Pliers
– Elastic cord / sheering elastic/ or thread


Instructions
-
1
First of all finalize the size and number of safety pins, which are available in large, medium and small sizes. The larger your safety pins, the larger the size of the bracelet. Approximately, 85 safety pins are enough for a medium size safety pin bracelet but you can increase or decrease the number of the safety pins, keeping your wrist size in mind. If you are making the safety pin bracelet for the purpose of presenting as a gift, then keep the age factor in mind and select small safety pins for kids, medium for teenagers and large for grown women.

-
2
Select the beads
Decide the color and size of the beads keeping your preferences in mind. You can find huge collection of bracelet beads in your nearest market. Use same color beads to keep the bracelet simple and combine various colors to make a colorful safety-pin bracelet. Open the packet of the selected breads and place them in a beads tray or any other dry container.
-
3
Add beads into the safety pins
Pick one of the selected safety pins and carefully open it up. Now start adding beads in the desired pattern. Repeat this simple method with the remaining 84 safety pins.
-
4
Close the safety pin
Now close all the safety pins properly.
-
5
Press down the safety pins
Once you close the all the safety pins, use a pliers to press down the pins’ heads - where you locked the pins in place. It helps in holding the safety pins firmly closed.
-
6
Cut two sheering elastics
Take a sharp scissor and cut two sheering elastics / elastic cords that will fit around your wrist, leaving room for the safety pins and a knot.
Note: Wrap the elastic around your wrist to get an idea of the length and then cut.
-
7
Observe the two holes of the safety pins
Observe the closed safety pins and notice that there two holes at both ends of each pin. The first one is in the pinhead and the other one at the other end where the metal is turned. Name the pinhead’s holes as “Hole A” and “Hole B” for your ease. You have to use these two holes for threading up the safety pins together.
-
8
Thread the safety pins into the elastic
Thread the closed safety pins into the first piece of the shirring elastic / elastic cord as it is shown in the image on your right hand side. Thread the first piece of shirring elastic / elastic cord through Hole A of the first safety pin and then through Hole B of the other one. Repeat this procedure until you thread together all the 85 safety pins into the first piece of shirring elastic / elastic cord.
-
9
Repeat step 7
Repeat step seven with the second piece of the sheering elastic / elastic cord. -
10
Tie the two ends of the elastics
The moment you thread the last safety pin into the elastic, make sure to tie the two ends of the bracelet together in order to give it a nice finishing touch.
-
11
Enjoy!
Wear your handmade Safety Pin Bracelet around your wrist and Enjoy!

- Small beads of your favorite colors
- Sheering elastic
- Scissors - the sharper the better
- Bead tray or some other container to hold beads
- Pliers
- Elastic cord / sheering elastic/ or threadNext%20stop%3A%20Pinterest "Pin It")


