How to Make Soft Toys with Socks
You have just cleaned out your laundry bag and in front of you is a gigantic pile of mismatched and deteriorated socks. You might be thinking about throwing them away but what if you make a cute toy out of them? Making toys with socks is fun and a cost-effective activity where you can save hundreds of dollars that you are planning to spend on buying new toys for your child.
Read the simple steps stated below and make a sock toy without a lot of out-of-pocket expense.
Things you will need to make a sock toy
– Two matching socks – you can also use socks in contrast
– Needle
– Thread
– Scissor
– Polyester toy stuffing
– Pencil
– Ruler
– Buttons
– Beads
– Common Pins

Instructions
-
1
Bring into line all the materials used in making a sock toy in order to avoid any type of mess.

-
2
Take a sock that is of no use for you and gently stretch it from all directions in order to loosen it up well.
-
3
Now, take a sharp medium scissor and carefully cut the foot off behind the heel area of the sock. This will be your toy’s head.

-
4
Use the same scissor and smoothly cut two strips from the ankle part of the same sock, these will later form the ears of your toy.

-
5
Set the sock’s cuttings aside for the time being. Now, take another sock of the same matching or contrast and open it out and flat like the way you were putting it on.
-
6
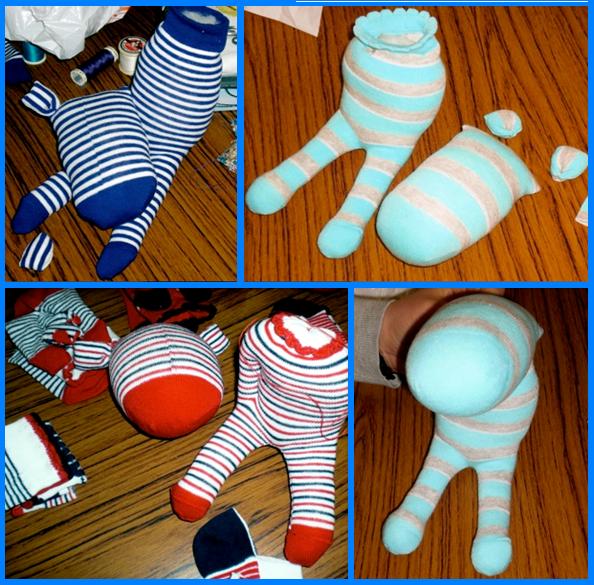
Now, lay the sock with its heel flat down and draw a center line on it, just about an inch before you get to the sock's heel section. You can use a lead pencil and ruler for drawing a line.
Note: Start drawing the line at the toe and stop at the opening side of the sock.

-
7
Cut the sock along the line. Now, roll the sock inside out and pin it with the help of common pins.

-
8
Leave just about ¼ inch between each of the seams and sew both of them by hand. These are your toy’s legs.
Note: You can use a sewing machine as well. -
9
It is time to stuff your toy. Take your time and soften the polyester toy stuffing into the bottom of your feet. Roll the polyester toy stuffing into a medium ball for the head of the toy, two cylinders for arms, and large ball for his body. Subsequently, place the toy stuffing inside the sock to give it a body shape.

-
10
In order to close the toy’s neck, simply run a running stitch all around the top border of the sock. Now, pick a needle and stitch over a few times, finishing up any resulting gaps.

-
11
Use the same needle and thread and run stitches back and forth through the body in order to define the toy’s arms.
Note: Repeat this activity on both sides of the body of the toy where its arms should be.
-
12
Now, run your needle right all the way through the sock, stuffing from one side to the other. Make sure to pull your toy nice and tight. Set your toy’s body aside for the time.

-
13
Grab the ankle strip and cut it into half along the width side. Sew both the sides up properly and turn it inside out in order to make ears for your toy.

-
14
Fill stitched strips with some polyester toy stuffing and sew them closed, attaching to the seam on your toy’s head.

-
15
Now, you have to sew the body and head of your toy together with a needle in order to give it a proper shape. Pick the head of the toy and firmly stitch it to the shoulders, running a stitch all around the fabric on the shoulder.
Note: Make sure to use a thread according to the color of the sock.
-
16
Your sock toy is almost ready as you just have to make the eyes and nostrils. Grab a ballpoint and mark the exact position on the toy’s face where you would like the eyes and nostrils. You can use common fabric buttons to make the eyes and beads for the nostrils.

-
17
Surprise your child with this unique handmade sock toy that shows your effort and how much you care for him or her.


