How to Repair Damaged Plaster
Repairing damaged plaster can be a daunting thing to do but it not something that you can not do yourself. You just need to have basic repairing skills and some repairing tools to get the job done.
Things Required:
– Spackling compound
– Putty knife
– Fine sandpaper
– Primer
– Paint
– Plaster washers with screws
– Drill and driver
– Joint compound
– Mud Pan
– 6-inch spackle knife
– Drywall
– Utility knife
– Paper Drywall-reinforcing Tape
– 150-grit sandpaper


Instructions
-
1
Apply spackling compound to the damaged area using a putty knife. The compound may shrink when it dries leaving a slight indentation. If that happens, apply another coat of spackling compound and let it dry completely.
Image courtesy: doityourself.com
-
2
Sand the dried coat of spackling compound to make it smooth. Use fine sandpaper for the job. Brush the area up with primer and paint.
-
3
Prepare an appropriate quantity of joint compound and transfer in into a mud pan.
Image courtesy: diyadvice.com
-
4
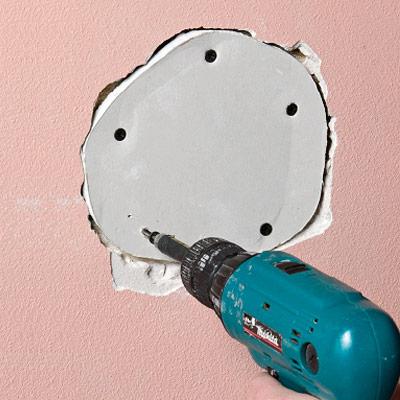
The damage may have left loose chunks of plaster. Get rid of any small loose chunks and patch the holes. Now you need to attend to the larger sections of damaged plaster. Reattach them and use plaster washers with screws to hold them in place. To make holes for the washers, use an electric drill. Ideally, you should install the plaster washers approximately 7cm apart from each other. Use joint compound to cover the area.
-
5
Now we attend to large cracks in the plaster. On both sides of the crack, install screws approximately 6 inches apart from each other and about 1 inch away from the crack. As before, cover the area with joint compound.
Image courtesy: littleitalygem.blogspot.com
-
6
Now you need to attend to areas where the plaster is missing altogether. Fill small holes with joint compound to with 1/8 inch of the surface. Use a 6-inch spackle knife for the job. To make sure the compound stays in the hole, scratch it in a crisscross pattern using the edge of the spackle knife and leave the compound to dry. After it dries, apply another coat of joint compound to level the surface.
-
7
Measure the area which is missing plaster completely with a measuring tape. Cut a piece of drywall similar in dimensions to the plaster-less area using a utility knife. Screw this piece of dry wall to the lath. To hold the dry wall in place, use a coat of joint compound and reinforce it with paper dry-wall reinforcing tape. To make sure the dry wall holds, apply a at least a couple more coats of joint compound letting the first coat dry before you apply the second one.
Image courtesy: bzesty.com
-
8
After the compound is completely dry, use 150-grit sandpaper to level the surface.


