How to Tile a Bathtub Surround
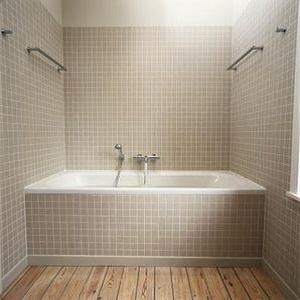
The task of installing tiles around your bath tub might appear daunting to home owners. However, the effort is going to rid you of wet plaster walls and change the whole look of your washroom. Since tiles come in so many vibrant colors and even textures, they bring a whole a whole theme with themselves to the place. With a guide as awesome as our step by step one below, you are going to find the whole process very much possible to do on your own without nay professional help. Lets get to work!!
Things required:
– Tape measure
– Pencil
– Level
– Wall tiles with self-spacing nubs
– Thin-set mortar
– Notched trowel
– Tile cutter
– Grout
– Grout trowel
– Sponge
– Caulk
– Caulk gun
– Grout sealer
– Small sponge brush


Instructions
-
1
Measurement:
The walls around your bath tub, marking out the borders of the area you want to tile. Find a center point for each one of them and divide them into four square each. The center point will serve as your reference point for laying tiles. Do a dry run first over the wall without any adhesive. This will give you an idea of the arrangement. Try to arrange in a way that only full tiles are used so that you have to cut very few tiles.
-
2
Apply Adhesive:
Start working on one square at a time. Use your trowel to spread adhesive on the surface. Since most adhesives dry within less than half an hour, work in small patches so that you are able to lay tiles before the adhesive dries.

-
3
Lay tiles:
Start laying the tiles and covering up the squares. The first tile should be installed at the center point and work outward from it. Some tiles come with pre-installed spacer. If yours do not, install plastic spacers after every tile yourself to maintain even joint lines.
-
4
Cut tiles:
When you reach a corner or wall or the ceiling, where a whole tile does not fit in, slide a tile over an existing laid one and mark where it overlaps. Cut this tile using a tile cutter and attach it like the other tiles.
Drill holes into tiles to accommodate space for protruding fixtures like pipes and valves.
-
5
Grout:
After you are done with the surround, let the tiles set in for a day.If you has used spacers, take them off using a screwdriver.
Mix grout with water in a bucket and stir to form a consistent paste. Use the trowel to spread it over the tiles, focusing on filling the joints and spaces in particular. Let the grout stay for 20 minutes and than wipe the tiles with a clean sponge and clear water. This way the tile surfaces will be clear of grout while the joints will remain filled.


