How to Upgrade a Macbook Laptop Hard Drive
If you are running out of space on your Macbook laptop hard drive, it is time for you to upgrade to get larger space. Apple generally recommends leaving 10 per cent of space on your drive free, and if you are using an 80GB drive, it translates into 8GB free space that you should have all the time. You can upgrade your drive to a larger or newer one even without a space problem, and the task is performed at a delicate ease. It is not much time-consuming either if you follow simple steps.
Before starting the process of upgrade you should be aware of the needs. For example, how much space you want in addition of the existing hard drive. This will help you to quickly select the right hard drive. You should also be aware of all the procedures and have right tools available to perform the task.
Also, if you are using Time Machine to back up your data, you can have all your music and other data restored to new hard drive without any hurdle. For this you do not need a CD or DVD to back up the data, and all of it is transferred quickly and effectively.
Things Required:
– 2.5-inch SATA hard drive.
– Apple restore disc/copy of OS X Leopard.
– External backup drive.
– Small Phillips-head screwdriver.
– Small Torx-head screwdriver.


Instructions
-
1
Selection of Hard Drive
Selection of the right hard drive is the first step towards implementation of your upgrade project. Being aware of your Macbook's specs will help you pick the right drive. You should select the hard drive that is compatible to your laptop's operating system. If your laptop does not accept a hard drive that is meant for Windows, do not buy one. -
2
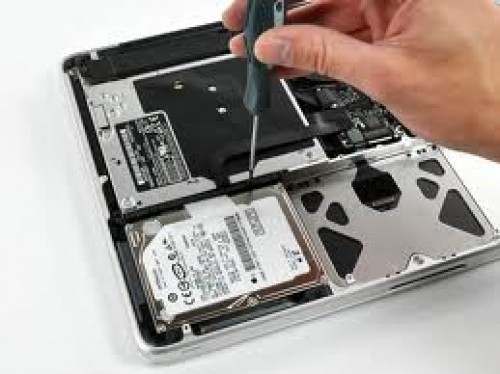
Remove Old Hard Drive
Once you have made available new drive, from back of your laptop unscrew the place where the drive is placed and remove it carefully. Take extra care while unscrewing the patch as no damage should be caused to your drive. Then replace it with the new one in similar way. -
3
Format New Drive
Although it is not necessary, you can format new drive. This will clear the drive of all used space and give you all space free. Also, use external drive via Time Machine for data backup. -
4
Reinstallation of Operating System and Data
Once your new hard drive is at position of the old or removed one, use OS X Leopard disc to re-install operating system. You can also restore your backup data from external link via Time Machine. From the disc you can select utility tab and from main menu click re-install from restore. If you are re-installing from external drive plug it in and the process is completed.


