Windows 8 Charms Bar in Windows Using a RocketDock Skin
After using the preview version of Windows 8 you will definitely admire the Charm bar. It makes your task quite simple and easy. But if you are still held up with Windows 7 and wish to have the feature of Charms bar in your previous operating system then that can also be done with the help of a special tool known as the RocketDock Skin.
The free customizable application, RocketDoc, is a free application launcher for Windows. This link will help you in adding the RocketDox skin on your desktop.
Follow the simple procedure laid below carefully and get Windows 8 Charms bar in Windows 7, Vista, and XP using a RocketDock skin.


Instructions
-
1
After downloading, you will first have to extract the .rar file.
-
2
After extraction, three folders along with the StartMenu.exe flash drive will appear.
-
3
The Chamber Transparent folder will have to be copied in the skin folder that is present in the RocketDoc program folder.
-
4
Before adding the Charm bar skin, do not forget to make a backup copy of the previous setup of RocketDock in order to get the backup copy of the icon folder along with the Setting.ini file.
-
5
The icon folder should be copied to the RocketDosk program folder by replacing existing one and the wp-content/uploads in it.
-
6
The extracted folder contains two wp-content/uploads; one is Settings.ini and the other is Settingstransparent.ini. With the settings.ini you will get Charm bar with a black background. You can acquire the black background by copying the settings.ini in the root of the RocketDock folder. For a transparent Charms bar, follow the similar procedure for Settingstransparent.ini.
-
7
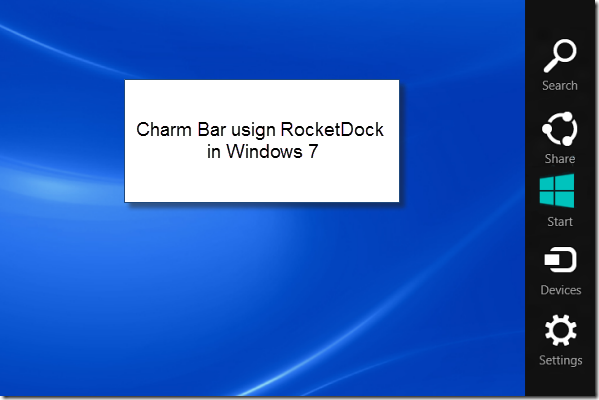
A new skin, settings and icons will automatically be used when you access the RocketDock. Besides that a charm bar will be displayed on the right side of the screen.
-
8
If, by any chance, the settings icon does not work then open the control panel and edit the target given.


