How to Install a Video Intercom
A video intercom is one among today’s latest inventions that can be used to see and speak to visitors/guests, without opening the door. It simple gem increases the overall security at your home and business as it provides you with an opportunity to confirm the identity of people outside before giving them permission into your building. Moreover, you can use it to the activities going on in any of the specific area. Huge collection of video intercoms is available in the market, from high-end models to the easy on the pocket ones. They produce images in both color and black and white.
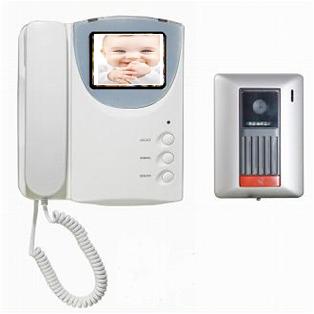
The video intercoms work with a camera unit and a Master station / display monitor. The camera until will be set outside the entrance door/designated area and the display monitor will be mounted inside, displaying whatever points at.
Things Required:
– Video intercom system
– Lead Pencil
– Electrical Drill Machine
– Saber Saw
– Screws
– Cables and extra components
– Flat head screwdriver
– Wire Connectors
– Caulk Gun


Instructions
-
1
Fix the intercom’s monitor
Place the video intercom’s monitor on the wall and lightly trace it with the help of a lead pencil.
Carefully cut the opening of the intercom system’s Monitor.
Use an electrical drill machine to bore medium holes in the wall, right at the four corners of the monitor’s outline. Now cut out the hole, using a saber saw.
Gently place the monitor in the drilled hole and fix up thoroughly, trimming the edges - if necessary.
-
2
Mount the Camera of video intercom
Select an appropriate location outside the home or business so that you can monitor your visitors/guests properly. If your video intercom’s package contains flanges or brackets, simply measure holes in them and use a drill machine to bore holes. Now use medium wall screws to fix the video intercom’s camera on the external wall. In case if the package contains any other type of supports, then follow the instructions of the booklet to install them properly.
-
3
Fix the Wiring
Turn off the power before fixing the wiring as failure to do so could result in electrical shock. Use the drill machine to bore a hole in the external wall to pass the camera’s wire through. Now tie the camera of video intercom wire to the monitor and make sure that the wires for the lock release are connected properly. In case you are installing a wireless video intercom skip this step.
-
4
Test the system
Ensure all the links and the attached wires prior to checking the functioning of the Video Intercom system. Make sure that video intercom system’s substations are thoroughly attached to the master station.
Restore the power to the main circuit and confirm the functioning of your video intercom system. Ask someone stand outside and check the picture from the camera inside, ensuring that the audio system is operating correctly. -
5
Seal up any gaps
Once you confirmed that your Video Intercom is installed properly, seal up the gaps around the camera and monitor by caulking to give a smooth finishing touch to your project. Otherwise, you can also use trim molding.


