How to Make a Milk Carton Catapult
Catapults have been the weapons of mass destruction in ancient warfare and were used to throw heavy objects to a significant distance. Although catapults have become obsolete in their true purpose, you can make a small one just for fun. You can use some spare things from your home to indulge yourself in this fun-filled activity of making a mini-catapult. An empty milk carton can be used to make a catapult and it will have certain fire power to throw smaller objects with reasonable accuracy. It won’t take much of your time either.
Instructions
-
1
Take an 8 oz. empty milk carton and cut its peaked top with help of scissors. This carton will form the base of your catapult.
-
2
You have to cut the carton into a certain shape to form the base. Use the scissors to cut two-thirds of one side and leave the one-third at the bottom.
-
3
Turn the carton such that the two-third cut side faces you, while the open top is pointed towards the ceiling. Carve a small hole in the middle of the remaining one-third side of the carton with help of scissors.
-
4
Now you have to make two holes on both sides of the carton. Measure two inches from the top of the carton and carve a hole on the left side of it. Do the same for making the second hole on the right side.
-
5
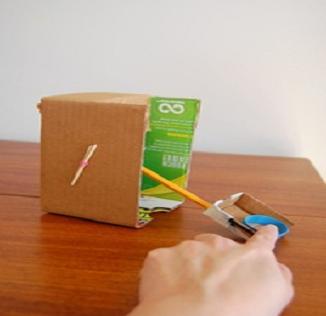
Now take a rubber band and pass through the hole carved on the cut side of the carton. You can secure the position of the rubber band by threading a toothpick through its loop.
-
6
Take a pencil and push through the holes you made on both sides of the carton. Make sure the pencil is evenly distributed between both holes.
-
7
Take an empty matchbox tray and drive another sharpened pencil through it. Affix the matchbox tray with tape.
-
8
For installing the arm of your catapult, push the other end of the pencil through the rubber band loop which you have secured with a toothpick earlier. Then, put the eraser end of the pencil on the centre of the pencil which you have driven through the side holes.
-
9
Now use another rubber band to fix these two pencils. Wrap the band over the eraser end of the second pencil and the central pencil. This will finish off the process of making the catapult’s throwing arm.
-
10
Pull the matchbox tray backwards and place a small object into it, like a marshmallow, and then let it go. You will see the object flying across the room the moment you release the catapult arm!
