How to Make a Trampoline Bike
Trampolines can be fun for people of all age groups. However, only temporary weightlessness, provided by endless bouncing, is simply not good enough for some. For such people, trampoline bikes were developed. Making a trampoline bike at home is a very easy task and the things required are readily available and inexpensive.
If you do things properly, making a trampoline bike would not take too long. Just make sure that you spend enough time practising before even thinking of pulling off tricks on a homemade trampoline bike.
Things Required:
– Bicycle
– Padding
– Duct tape
– Set of socket wrenches
– Degreaser
Instructions
-
1
Start disassembling all the parts from the bicycle one by one till only the frame, seat and handlebars remain intact. The parts you would need to remove include wheels, chain, pedals, crank, bearings etc. Use a set of socket wrenches and other tools for this purpose.
-
2
Use a degreaser to remove grease which will be present at all spots where a moving part was attached. Complete removal of lubricating grease will make the rest of the process much easier.
-
3
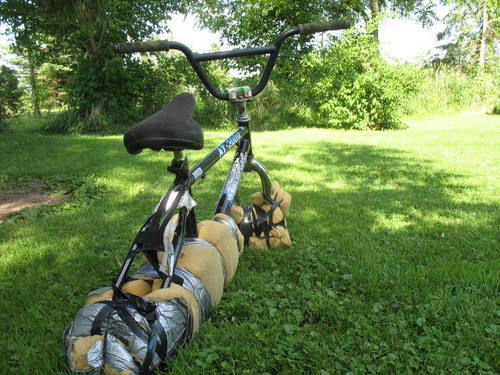
There would be a number of sharp spots on the bicycle. To prevent the risk of an injury, wrap all such spots by padding and then use long pieces of duct tape to secure the padding. Forks that once held the wheels in place should be heavily padded. Crankshaft pipe and handlebars are other sharp parts of the bicycle which you would need to pad up. Scrutinise the entire body of the bicycle to make sure nothing sharp remains unpadded.
-
4
At the end, give your trampoline bike a final look in order to ensure nothing is out of order. Make necessary adjustments such as adding more padding or duct tape if required.
