How to Build a Rabbit Hutch
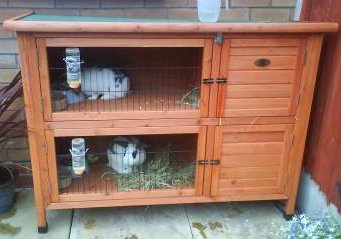
Most kids like to have a rabbit as their pet. However, having a rabbit in your house is good only if you have a proper place to keep it. A rabbit hutch is very much needed if you’re planning to breed rabbits. This is because like we need a comfortable place to live, the animals in the same way also require a place to live with comfort. If you go to the market to buy a rabbit hutch that will certainly be costly, but you can have it built at home with a little bit of effort.
Things Required:
Hammer
3 inch nails, 1 pound
Measuring Tape
Straight edge
1 inch nails, 1 pound
Chicken wire
2 door hinges
Hook and eye latching device for the door
2 sheets plywood
50 inch and 25 inch boards
Staples


Instructions
-
1
Keeping the number of rabbits you will have in view, make the dimensions of the hutch such that it is able to accommodate at least 3 rabbits at a time.
-
2
As you begin making the frame, cut f boards about 48 inches and 8 boards about 25 inches long and after cutting join the 50-inched board in an L-shape with the 24-inched one.
-
3
Join the end of 25-inched board with 50-inch board such that there is 5 inch width left on each side of the L shape with the 2 and a half inch width facing you.
-
4
The cage will be 48″ long, so the 25″ board will be on the inside part of the final frame - nail the end of the 25″ piece to the last 2″ of the 50″ piece.
-
5
Since the final length of the board will be 50-inch so nail the end of the 25-inch piece to the last 2-inch of the 50-inch piece in a way that 25-inch board form the inside part of the final frame.
-
6
With the help of nails and hammer, attach a second 50-inch piece at the opposite side of the 25-inch piece once more in the same way as in the previous step to make an elongated U-shape.
-
7
With the board pointing in the upward direction at the ceiling, nail the 25-inch board in each corner of the frame such that the 5-inch widths in all four corners are facing you.
-
8
Between two 25-inch boards, fit a 50-inch board with nails such that you see the rectangle vertically before you same as the one at the workbench but must be at right angle.
-
9
Now fit another 50-inch piece between the 25-inch vertical boards with nails on the opposite side of the work bench, in the same way as in previous step.
-
10
Last but not the least; fit another 25-inch board over two 25-inch vertical boards repeating the same step in the other side, until the resulting shape is a two-sided rectangular cage as well as the top and bottom.


