How to Carve a Turkey on a Pumpkin
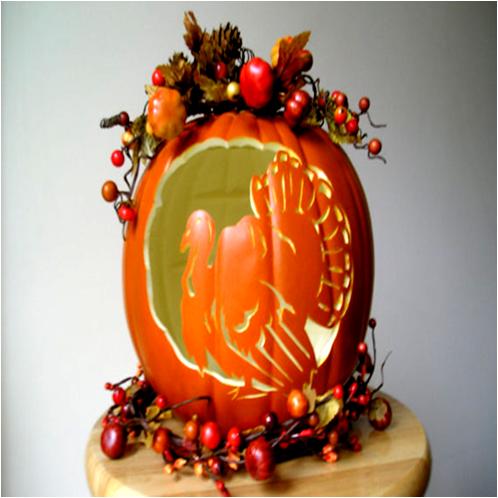
Carving a Turkey on a Pumpkin is one among the creative and unique arts ideas to make thanks-giving decorations or centerpieces. In addition, a Pumpkin Turkey is a superb decoration idea for Halloween. Setting it aside as an ornamentation piece during normal days is not a bad idea at all. It is made from a real fresh pumpkin and amazingly grabs the attention of people. Involve your loved ones in this interesting autumn holiday tradition to make it family craft idea.
Carving a Turkey on a Pumpkin is a very simple activity and required very few and easily available tools.
Things Required:
– Sharp Knife
– Newspaper or Piece of cloth
– Lead Pencil or marker
– Large metal spoon
– Small sharp knife or a saber saw
– Tea lights candles


Instructions
-
1
Select a Pumpkin
The selection of pumpkin is really important. Try to choose a pumpkin that is fresh and large in size. The bigger your pumpkin – the beautiful and clear will be the crafted turkey. -
2
Create a Work-surface
Create a work-place by arranging some old newspapers or a large piece of paper on a smooth surface - probably on your kitchen’s counter top. Place the pumpkin on the work-surface. -
3
Cut the top of the Pumpkin
Take a large sharp knife and carefully cut out the top (stem) of your pumpkin. Make sure that the hole is large enough to take out the seeds of pumpkin. Set the stem of the pumpkin aside for later use. -
4
Take out the seeds of Pumpkin
Now, put your hand into the pumpkin and hollow it out by removing all its seeds. -
5
Scrape the sides of Pumpkin
Once you scoop out the seeds of pumpkin, use a large metal spoon to scrape the inner walls of the pumpkin to make them thinner. The thin walls of the pumpkin’s shell make the cutting process easier for you, improving the lighting. However, make sure that the walls are not thin than 1 inch. -
6
Wash the Pumpkin
Wash the pumpkin with water to make it odour free and set aside at sunlight with the opening side down. Leave it for some time until dry completely. -
7
Sketch a Turkey
Now, sketch a cute turkey on the outer surface of the pumpkin. Use the given below two procedures for this purpose:
- Draw a Turkey: Use a marker or lead pencil to draw a turkey on the outer side of the pumpkin.
- Turkey Template: If you are not good at drawing a perfect turkey, print out a turkey template and tape it with the pattern onto the exterior of the pumpkin. Now mark the turkey’s pattern of the surface of your pumpkin, using a pushpin to poke holes along the pattern's outline. Remove the template and discard. -
8
Cut out the marked pattern/sketch
Use a small sharp knife or a saber saw to carefully cut out the marked or sketched turkey pattern, grazing out about ¼ -inch of the pumpkin’s flesh with the help of a loop tool. -
9
Lighting
Your Pumpkin Turkey is almost ready; place some tea lights candles inside it and set its stem on the top. Set your Pumpkin Turkey where ever you want and enjoy.


