How to Make a Baby Food Jar Pumpkin
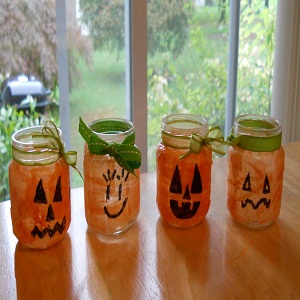
Baby food jars make a regular appearance in our trash can. You can let your creative soul out for once and turn them into useful decorative pieces. It will also be a recycling effort on your part by using waste products products around the house itself. These jars can easily be turned into a baby jar pumpkin which can be used to carry Halloween treats or even as a candle stick holder. They can be given as gifts and also make great decoration units. There is no limit to imagination and how you are going to use them. Our step by step guide gives you the basic outline of this task, leaving the frills and trimmings to your own aesthetic sense. Have a look!
Things Required:
– Baby food jar
– Raffia
– Brown acrylic paint
– Orange acrylic paint
– Black acrylic paint
– Pink acrylic paint
– White acrylic paint
– Clear acrylic spray sealer
– Sea sponge
– Paint brush
– Toothpick
– Fine line black permanent marker
– Scissors
– New pencil
– Vinegar and cotton ball


Instructions
-
1
Clean out the jars. Wash them and dry them completely. Use vinegar dipped in cotton ball for efficient cleaning.
-
2
Use the sea sponge to apply the brown acrylic paint to the entire outer surface of the jar. Let this paint dry up well before you proceed. The paint is your base for the pumpkin theme.
-
3
After the brown paint has dried up, sponge a layer of orange paint over it. The mix of orange and brown will give the perfect pumpkin color for your jar. Let the paint dry well.
-
4
You now have to make the face and expressions of the pumpkin. Mark a point in the center of the jar for the nose. Draw a triangle with the black acrylic paint and brush. A triangular nose complements the Halloween theme.
-
5
Mark the points for the two eyes on the top two sides of the nose. Draw two triangular eyes for your pumpkin jar. Take care of the appropriate proportion and distance from the nose.
-
6
Use the pink acrylic paint and paint brush to paint two cheeks at the lower sides of the nose. The cheeks should be round, equal in size and at equal distance from the nose. Draw the mouth using stitch lines from one cheek to the other. You can also omit making the cheek apart and simply draw a stitch line at the bottom of the nose.
-
7
Spray the entire surface with an acrylic sealer. Tie raffia or ribbons around the jar mouths and you are set to go.

