How to Make Marbled Nails
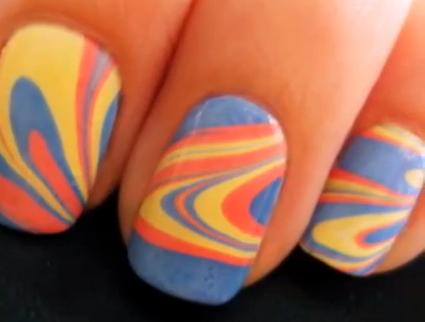
Water marble nail art technique is popular among ladies and fashionistas as it gives them a chance to wear mixed coloured designs on their nails. If you are tired of wearing the conventional colours on your nails or want to try out something new, then why not go for marble nail art technique. It is very simple and easily imparts each nail with a unique pattern of mixed colours.
You will need a water bowl, a toothpick, base and final coat for nails, a few nail polishes of colours that you prefer, and a scotch tape to cover the flesh around the nails.


Instructions
-
1
Cover the area at the tip of your finger, beneath the nail and alongside the cuticles with a scotch tape. It would prevent your fingers to get nail polish and will only give nail polish to the nails.

-
2
Apply a base coat on your nails for their protection and then paint 2 coats on your nails of white colour (nail polish).

-
3
Fill (room temperature) water in a bowl. Open various nail polish bottles. Use contrasting colours like one pale, one medium and another dark shade.

-
4
Drop one or two blobs of first nail polish, the base colour, on the water. It should spread out in a circle on water’s surface and should not drop down to the bottom. If it drops down then use another nail polish. Next, drop one or two drops of the second nail polish on the water bottle on top of the base colour. It will also spread on the water in a circle and repeat the same for the third or may be fourth nail polish.

-
5
Now insert and rotate a toothpick in the bowl to create a pattern of marble effect. Give it swirls.

-
6
Now immerse your nail in the water and then remove the nail. The nail polish with marble designs will stick to your nail. Before removing your nail from water, rotate the toothpick again in water. The excess nail polish in water will now stick to the toothpick.

-
7
Remove nail from water and remove the tape around it. Remove tape or use nail polish remover and cotton swabs to clean up any excess polish.

-
8
Apply the final protective coat and your marble nail is ready. Repeat this for the rest of the nails.


