How to Coat Ceiling Joints with Joint Compound
Slapping a joint compound coat to ceiling joints is a common task that almost all of us are tempted to. It can be done with ease and perfection by following certain steps. To achieve better results, particularly a smooth and clean finish, let the wall dry out before joining the ceiling.
Also, it is a good idea to apply tape after trying one coat of the compound and apply a second coat on the tape. This will give you a great finish, as you might have not expected, and will add to the beauty of the ceiling. Although, the actual coating process is easy and not that time consuming, but to get better results it is better you let the wall dry out and then also take some time after application of the first coat.
You do not have to be an expert to add a coat of joint compound to your ceiling. It can easily be performed, and for finishing, which is the most delicate part of the job, application of tape is of great help. You can ask your family members to comment on your work and point out any shortcomings. This will help you achieve perfection in finishing off your work.
Things Required:
– 6″ inch speckling knife
– Joint Compound
– Tape


Instructions
-
1
Use Spackling Knife
Generally, a six-inch speckling knife is recommended for the job. Putting the compound into the joint or space between ceiling and wall is difficult. With the knife you can let the compound feather out without leaving grooves in the middle, which you may not be even able to see. -
2
Put Compound Into Lump
To put the joints compound into the lump put it into the spackling knife and then run it through into the lump. The compound will get into all gaps and grooves, whether or whether not you see them while filling in the joint compound. -
3
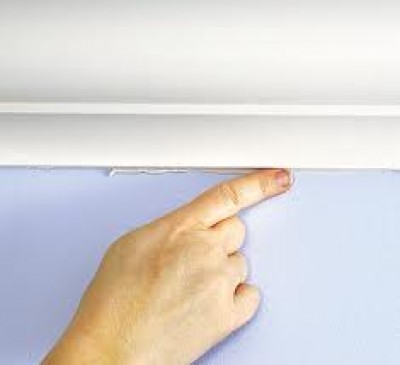
Put Tapping
After first coat of joint compound, put tapping on the joint between ceiling and wall. Then you can use the knife's edge to push the tape into the joint slightly with your index finger. Be careful and do not push too hard the knife as it can rip through the tap and the purpose of protecting coating can be wasted. If you damage the tape it will not give you the finishing you want out of the joint coat. -
4
Apply Second Coat
The way you used the knife to apply first joint coat, you can do the same again. However, since now you are applying the coat on the tape, you do not have to push your finger too hard on the edge of the knife. Repeat the process by running the compound from one end through the second end, and once done leave it out. -
5
Let Joint Dry Out
After you are done with application of second coat on the joint with the compound, let it dry out. This completes your job and you can see a clear difference of compound that it has given to the joint between ceiling and wall.


