How to Install an Ironing Center
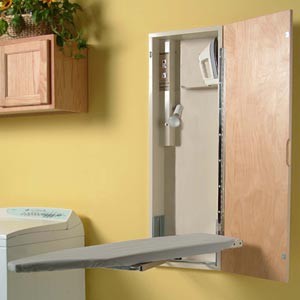
If you have small living area then you have to be extra smart in order to make your home clean and tidy. You have to use slim and smart materials to manage with space issue. Iron center is an important area where you want to iron in relaxed and free area. Congested area leads towards irritation and you can’t perform your task properly. To solve this annoying issue we have best solution to install ironing center in your wall. And you can use this idea to save your area.
Things required:
– Stud finder
– Carpenter’s level
– Drill machine and its bits
– Combination square
– Electrician’s fish tape
– Jab saw
– Screwdriver
– rubber gloves
– Iron board cupboard
– 1 1/2 inches Drywall screws
– 2×4 lumber Romex cable


Instructions
-
1
Find out Center of the wall
While using stud finder, look for the wall center where you want to fix the iron center, when you decide the location mark it by using led pencil. For straight draw you can use a level, draw a perpendicular line down the center of the wall.
-
2
Draw the template
By using cardboard, draw a template of the ironing center. Arrange the center of the template according to the drawn mark on the wall, and mark a line around it.
-
3
Wall cutting
Pick up the Jab saw and start cutting square board according to outline of the template. Cut it large enough so that your arm could move freely around the board without any obstruction. Finish up the cutting when inside of the wall is clear to you.
-
4
Position and Secure the Cabinet
Now slide the iron cabinet into its position. Attach it by screws to the wall and then clip up it with electric board.
-
5
Sanding the cabinet
In order to make the door surface smooth, sand it. After finishing sand process, remove dust from the cabinet door with soft piece of cloth.
-
6
Apply Stain on the door
Wear your rubber gloves and apply stain along with wood grain. Keep on applying till it gets as level as it could. When you are done with stain and door surface is fully covered with it, now use cloth rag and clean the excess. Now let it dry and then stain the other side of the door.
-
7
Finishing fixing
Now check the door by closing it more than single attempt for final fixing.


