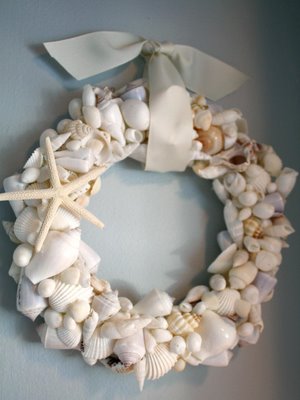
How to Make a Seashell Wreath
A beautiful way to display an already existing sea shell collection, to present the prized pickings of a day of seashell combing at the beach, or even to celebrate Christmas in a warm, sunny location, a seashell wreath is unique, elegant, and loaded with the nostalgia of bright summer days at the seaside. In addition to using seashells to make the base of the wreath, other ocean-related items can be used to give it added flair and embellishment, and it can then be hung up on a wall, or over the mantelpiece.
Things Required:
– Seashells
– 10 or 12 inch straw wreath
– Old newspapers
– Hot glue gun and glue sticks
– Ribbon
– Beach flowers, sand dollars or dried starfish


Instructions
-
1
Start with a large pile of seashells. Ideally, these should all be hand-picked to make sure they are all perfect, and deserve to be displayed in your home – do not scoop up random handfuls of shells, as some might be chipped, broken, or just plain ordinary. Once you have a large pile, wash them all, and then proceed to dry them all thoroughly with a soft cloth, to clean them and add an element of polish and shine.
-
2
Next, proceed to sort the shells according to size. They will be layered onto the wreath depending on how large or small they are, so create three piles – small, medium, and large shells. At this point, you can also create a rough sketch of how you want the wreath to look, in order to gain a clearer idea.
-
3
Now, spread out some old newspapers, and place the straw wreath down flat – this will serve as the base of your seashell wreath. Then, proceed to glue on the first layer of shells; the first layer should consist of the shells from the ‘large’ pile – make sure they are the biggest ones in the batch. Apply strong glue to the edges of the shells before pressing them down.
-
4
Once the wreath is covered from top to bottom, allow it to dry for around an hour. Then, begin applying the medium-sized shells, adhering to the same pattern you followed with the large shells. As you glue these on, make sure you keep the design uniform and even. Cluster the shells in spots where gaps were left while gluing on the large shells.
-
5
Allow the layer of medium-sized shells an hour to dry too, and then proceed to glue on the final layer of small shells – ideally, these should be the prettiest of the batch. Make sure there are absolutely no gaps left in the wreath – if there are, they should all be covered by the small shells.
-
6
Once this layer has dried too, affix a ribbon to the wreath – this can be entwined and looped through the wreath, or simply tied into a bow and fixed to the top. Blue and yellow ribbons will work best, as these are the colours of the sea, but you can also use pink or white. Use hot glue to attach the ribbon.
-
7
Finally, glue on additional embellishments, like beach flowers, sand dollars or dried starfish, in strategic spots, to give the wreath more texture and added visual appeal. Allow the entire thing to dry, and then hang it up at your desired spot.


