Making Chocolate Bowls for Ice Cream with Balloons
Theodore Levitt has well said, “Creativity is thinking up new things.” Think out of the box, why serve ice cream in conventional bowls that have to be washed after every use? You must have been using balloons for decoration. Have you ever created mouth-watering chocolate bowls with balloons? If no, then this is the right article for you. Whereas you will not eat the balloons, you will make use of them as a cast around which melted chocolate will cool, outlining small chocolate bowls. It is a unique way to present a traditional ice-cream while giving it a great taste. It seems a daunting task but these chocolate cups are super easy to make. If you want to try them at your home, then go through the simple steps given below and enjoy some nice comments for your creativity.
Things you will need to Make Chocolate Bowls for Ice Cream with Balloons
– Small “water bomb” balloons, or the smallest balloons you can find
– 2 cups of semisweet chocolate chips
– Metal Bowl
– Baking Sheet
– Wax Paper
– Refrigerator
– Scissor

Instructions
-
1
Align your Ingredients
First of all, align all the equipments used in making the chocolate bowls.
-
2
Melt the chocolate
Take a medium sauce pan, pour in water until half-full and place it on your stove over medium heat. Wait for a few minutes and bring the water to boil. Meanwhile, grab a medium metal mixing bowl and place 2 cups of semisweet chocolate chips in it. However, you can use any of your favorite chocolate bars as well. Now, set the metal bowl on top of the saucepan of simmering water. Stir the chocolate solution with a large spoon or a whisk. Keep stirring until the chocolate dissolves from top to bottom and is smooth. Remove the chocolate bowl from heat and set it aside at room temperature to cool in order to make sure that it is not too warm to touch.
Note: Make sure the melted chocolate is neither too warm nor too cold. Your balloons might burst in warm chocolate paste which is nothing to worry about, but infuriating to clean up! On the other hand, a chilled chocolate paste will start to set which is again irritating and tough to handle. Therefore, make sure that the melted-chocolate is barely warm.
-
3
Blow up your balloons
Until your melted chocolate is cooling, blow up your balloons, giving them the size you want. For this purpose, pick a small size balloon and give it a fine stretch in various directions in order to loosen it up well. Now, take hold of the opening of the balloon between your thumb and index finger. Seal your lips around the opening of the balloon and take a deep breath, blowing air into it to the desirable size. Tie up the end of the balloon properly. Repeat the same method with rest of the balloons.
-
4
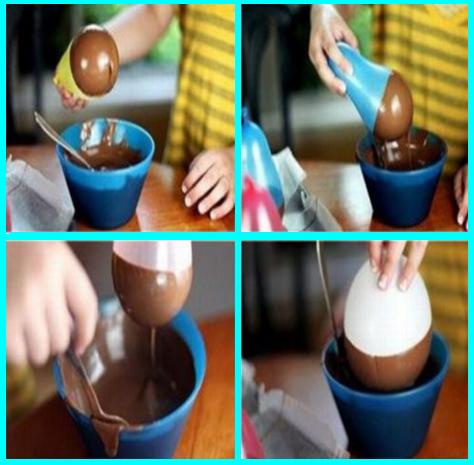
Dip the balloons into the chocolate
Now, grasp the balloon by its knot and gently dip its bottom in the chocolate paste.
-
5
Place balloons on baking sheet
Gently remove the chocolate dipped balloon and place it carefully on a baking sheet with the dipped side down. Make sure to line your baking sheet with wax paper before placing the balloons on it. Repeat the same method with the remaining balloons.
-
6
Wait for a few minutes
Wait for a few minutes until the chocolate dipped balloons on the baking settle down properly at room temperature.
-
7
Place baking sheet in refrigerator
Once the chocolate coating on your balloons is set, place the baking sheet in refrigerator in order to make the coating even harder. The hard chocolate coating on the balloon will make it easier for you to remove the balloons in the next step. -
8
Press balloons gently
Remove the baking sheet from the refrigerator and place it on your kitchen table. Pick one of the coated balloons, press it gently around all sides in order to break the seal between the balloon and the chocolate coat.
-
9
Release balloon air
Use your thumb and index finger to hold the balloon below its knot. Now, carefully cut the knot of the balloon with a sharp scissor. Unhurriedly release the air from the balloon in order to maintain the shape of the chocolate cups. Repeat same procedure with rest of the balloons.
-
10
Peel off the balloon
Smoothly peel off the balloon away from the inside of your chocolate bowel. However, do not pull it harder otherwise it will break and you will have to go through the previous steps.
-
11
Pour in Ice-cream
Your chocolate cups are all set to go. Now, pour in ice cream and store them between layers of waxed paper at cool room temperature before serving. Enjoy!


