How to Make Your Photos Look Retro in Photoshop
Adobe Photoshop is one of the most widely used photo editing software. In addition, it also helps to create different graphics and web pages. Almost all the designers, photographers and web developers use this software to get their jobs done. There are many versions of the software and it will be better for you to use the latest one order to avail all the new features.
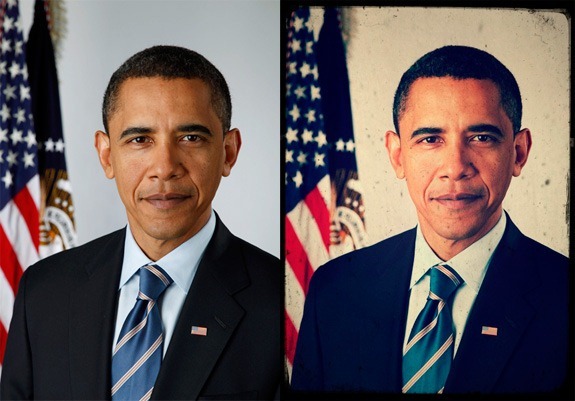
It is not very difficult to make your photos look retro in Photoshop. All you need is a little time to learn the procedure. If you are looking forward to add a retro effect to your pictures, you can take help from the given steps.


Instructions
-
1
First of all, you have to open Photoshop on your computer. You can easily open it by double clicking its icon on the desktop. However, if you have not created any kind of shortcut while installing the software, you will have to search for it in the list of programmes by going to the start menu.
-
2
After opening Photoshop, click on the file option which is given at the top left corner of the window and select open. Then, choose the picture to which you want to add the retro effect. It will be better for you to keep a copy of the original picture. However, you can also make layers of the pictures on Photoshop in order to keep the original file at its place.
-
3
To add the retro effect, you have to open the colour panel. Then, you have to make the curves. Go to the RGB curve and drag it a little up. After that, get the green curve a little down and the blue curve a little bit upward. Keep an eye on the photo and make the essential changes according to your choice in the colour combination.
-
4
Notice the change in the picture after applying the changes in the colour combination. You can use brush to make the picture look real. Use the brush very carefully so that it may not harm the sharpness of the photo. You can also use different default colour combinations to add a retro effect to your picture.
-
5
In the end, click on the save option and select the option of saving the picture in high quality.


