How to Use Quick Fix With Adobe Photoshop Elements 6
Many times it happens that after you take a photo, the camera does not capture the colours that were present in the real scene. It can be due to improper lighting or low quality of the camera being used. If you have captured an important moment and find that the colours are somewhat faded, then you can quick fix them using Adobe Elements 6.
It is a great image editing program, which helps its users to fix the colours, contrast and brightness of an image with just few clicks. It is really easy to apply the quick fix option in Adobe Elements 6, provided that you know the right process.


Instructions
-
1
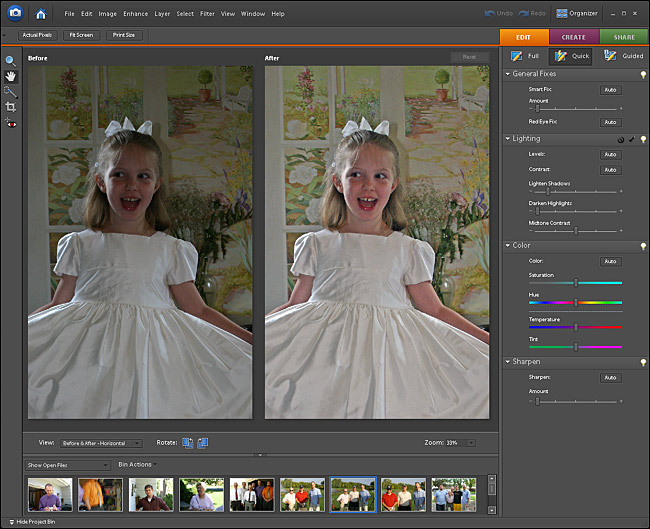
Run the Adobe Elements 6 application and go to the “File” menu. Select “Open” and locate and select the file you want to quick fix. Once you see the image appearing in the Adobe Elements 6 application window, click the “Quick” button to open the “Quick Fix” window.
-
2
Right after you click the Quick button, you will see a new window, with the same image appearing twice on the screen. The left side image will be shown under “Before” heading and the right side image will be shown under the “After” heading. The image under “After” heading will have the quick fix option applied on it. You will see a clear difference between the colours, brightness, contrast and sharpness of both the images.
-
3
If you feel satisfied with the Quick Fix, you can save the image as a new file using the “File As” option in the “File” menu.
-
4
You can also make further changes to the image even after you apply the Quick Fix. Just use the toolbar appearing at the bottom of the image. You can rotate the images, and even adjust their appearances by arranging both the images horizontally or vertically, as per your needs.
-
5
At the right side of the window, you will see sliders for basic image changes. At first, you will see the sliders slightly changed, as the program automatically used them to apply the Quick Fix. You can move the sliders for colours, brightness and contrast, and see the changes applied to the “After” image on the screen.
-
6
After you feel satisfied with your changes, go to the “File” menu and select “Save As”. Specify a location where you want to save the edited image and click “Save”.


