How to Make a Banner Clickable in WordPress
It is a common practice that people display pictures on their blog, with hyperlink attached to it. When a user visits the page with that specific image and clicks on it, he is redirected to the page linked to the image. The process of linking an image to a link is very simple and even a novice internet user can do it, if he knows the right process.
Therefore, if you own a WordPress powered blog and you want to add click-able banners to it, then you have reached the right place, as this article will talk about the easiest method to do so.


Instructions
-
1
Create or download an image which you want to link with a link. If you download it from any website, and want to make any changes to it, then you will have to use any image editing software program.
-
2
Run the image editing software program and open the image which you want to edit. Make the necessary changes and save a copy of it on your computer’s hard disk.
-
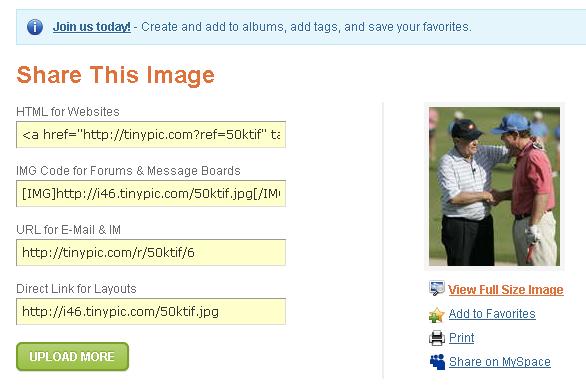
3
You can now visit tinypic.com, which allows its user to upload their images and create a clickable link. Click the “Browse” button, and you will see a new window appearing on your screen. Locate the image file that you saved and double click on it. You will now see the name of the file appearing against the Browse button.
-
4
Now you need to click the “Upload” button, to include the file into the website database. Choose the HTML for websites, in order to get a code which you can use to display the clickable image on your WordPress Blog.
-
5
In the first line of the code, you will find “tinypic.com” mentioned with the "href" tag. Here, you will need to replace http://tinypic.com with the URL which you want the visitors to be redirected to, when they click on the image.
-
6
You should also change the “alt=” line with the description of the website which is linked with the image. Make sure you write a short description, not more than one line.
-
7
Copy the entire code and paste in your WordPress post or any other part of your blog, and save the changes. You can then go to your blog and check if the image appears properly. If it does not, then you can change its place, or change the dimensions of the image to fit it in place.


