How to Make Coffee Steam in Photoshop
The combustion process is always accompanied by the release of smoke, as evidenced by the well-known proverb. However, smoke does not always occur in drastic events like fires or volcanic eruptions – the sight of aromatic steam rising from a coffee cup, for example, is incredibly soothing and relaxing.
Drawing wispy swirls of coffee steam can be hard, but the problem has been solved by modern raster graphics editors, and now, you can easily create a lot of pseudo-realistic images of coffee steam.
Drawing smoke is not an easy task, since its shape is variable and not quite specific. However, by patiently following a few steps, you can achieve quite a realistic effect when drawing coffee steam using the world-famous graphic tool – Adobe Photoshop.


Instructions
-
1
Create a new document in Photoshop. Press the key combination Ctrl + N, or click on the main menu items "File" and then "New". In the displayed dialogue box, set the parameters of the document. In the fields "Width" and "Height", enter the width and height of the image you want. It is best to set these values in the range of 400-600 pixels. In the "Background Contents", select "Transparent". In the "Colour Mode", set "RGB Colour". Then, click "OK".
-
2
Select a colour and foreground. Click on the controls located on the panel of tools that display the appropriate colours. There will be a colour dialogue. Set the foreground colour to grey and the background colour to black.
-
3
Fill the entire space of the image with the colour black. Reverse the colour of the background and foreground. Select the "Paint Bucket Tool". Click the mouse anywhere in the image. Again, swap the foreground and background.
-
4
Create a new layer. Click "Layer", "New", "Layer ...", or press Shift + Ctrl + N.
-
5
Create a blank smoke image and activate the "Polygonal Lasso Tool". Highlight the image region of arbitrary shape. The shape of the steam should be in the vertical direction and preferably, it should be irregular and asymmetrical. Fill the selection with a tool "Paint Bucket Tool" foreground. If desired, lighten the edge of the area with the tool "Dodge Tool". Remove selection by pressing Ctrl + D. Merge the layers by selecting "Layer" and "Merge Down" from the menu, or by pressing Ctrl + E.
-
6
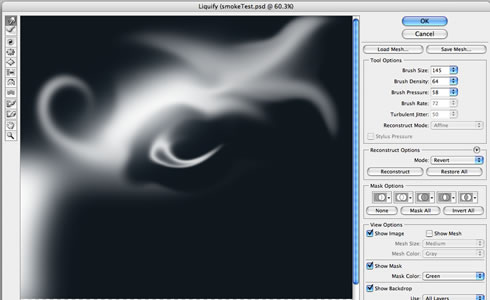
Apply the filter to the image “Wave” arbitrary. In the menu, select “Filter - Distort –Wave”. This will display the configuration dialogue. Pick the parameters of the filter to achieve the desired shape of the image, or repeatedly press "Randomize". Evaluate the result by watching the changing image in the preview pane. Click "OK" when satisfied.
-
7
Now, apply a blur effect to the image. Select "Filter", "Blur" from the menu. You should now have a realistic looking image of coffee steam.