How to Replace Your IPod Battery
Normally an iPod’s battery will last for a couple of years before starting to worn out. Extremely low battery time can be very annoying for anyone of us and no one would like to plug in charger again and again all day long. When your iPod’s battery life has gone this much low, it is obviously time to replace the battery. You can either send your iPod to Apple for a replacement battery by paying $60 or you can simply buy a new iPod battery from specified stores for $20 and replace it yourself. Most of you will go out for the second option and try out to replace the battery yourself.


Instructions
-
1
You will require a small flathead screwdriver to open up your iPod. Insert the screwdriver in the tiny space between the acrylic and metal portion of your iPod and carefully pry the bottom right corner. Be very careful while prying, as a little bit of more force can break the acrylic easily.
-
2
Now you have got an opening, you can put aside the screwdriver and use a plastic probe for prying purpose along the entire length of the iPod. Normally, when you purchase a replacement, two plastic pryers come along it. Use them to completely open up the iPod and be careful while prying the corners.
-
3
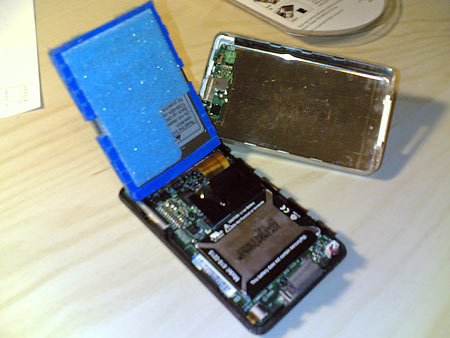
Gently open up the iPod into two halves. You could see the hard drive installed in one half and the battery attached on the other half of the iPod.
-
4
Be very careful in disconnecting the battery from its socket. You will have to pull out the power wire from the socket present on the motherboard. You will see a blue rubber surrounding the socket. Gently pull it and the power wire will come out with ease.
-
5
The iPod battery is glued to its roost and you have to gently pry it out using the plastic probe. Be very careful while apply force not to damage anything. Start prying round the edges and the battery will come out easily.
-
6
Now put in the new battery in its place and connect the power wire to the socket in the motherboard like it was before.
-
7
Put the two halves of your iPod together and gently snap them. Plug in the charger and if you see the battery charging signal on your iPod, it means you have been successful in your task!