How to Use a USB Mouse on Xbox 360
The possibility of making a USB mouse work on the Xbox 360 is something that has been debated upon since a long time. Gamers accustomed to playing first-person shooters using a mouse and keyboard on the PC fail to derive a similar level of satisfaction while using a controller to aim and fire their gun. Since Xbox 360 has made it quite clear that the console does not support USB mouse, many gamers have given up on the hope of enjoying the likes of Halo and Call of Duty from their comfort zone.
While it is true that Microsoft has not integrated the USB mouse compatibility on its console, somebody else has gone through the trouble of creating a possibility of playing Xbox 360 games using a USB mouse.
Things Required:
– Xbox 360
– Computer with Internet connectivity
– TV
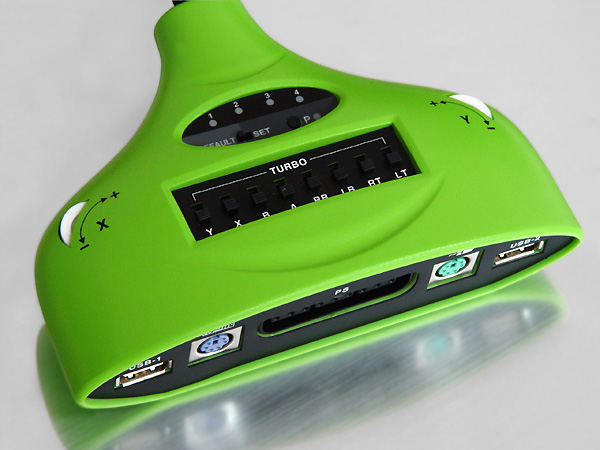
– XCM XFPS 360 adapter
– USB mouse
– Keyboard


Instructions
-
1
The first thing that you need to do is to get your hands on the XCM XFPS 360. It is a keyboard and mouse adapter for Microsoft’s current-generation console that would allow you to use input devices other than your standard Xbox 360 controller to play your games. You can purchase the adapter off the Internet by visiting the XCM official website and ordering it from there. At the moment, the adapter costs around $100.
-
2
Connect your Xbox 360 to your TV. Turn both the devices on.
-
3
Connect the XFPS 360 adapter to the console and plug the controller into USB slot 1 on the adapter. Wait until the “Console Connection Display” light turns on and then unplug the controller from the adapter. Connect the USB mouse into the same USB slot.
-
4
If the connection between the mouse and Xbox 360 is unsuccessful, repeat step 3 until the connection is successful.
-
5
The left-analog stick of the Xbox 360 controller will be mapped onto the mouse by default. You will, however, have to map the buttons on the keyboard that you will be connecting to the XFPS 360 adapter and using alongside your mouse. In order to do that, move the “Default/Set Switch” on the adapter to “Set”. Then press the “P” program switch on the adapter and wait for the “Program LED indicator” to light up.
Grab your controller and press the button that you want to map on the keyboard. The “Program LED indicator” will begin to flash now. Press your desired key on the keyboard. This will make the “Program LED indicator” go off, indicating that you have successfully mapped the controller button to your desired key. Repeat this step for the remaining buttons.