How to Wire a Car Stereo System
Wiring a car stereo system by yourself is a very easy process. You can perform this task even if you have very little knowledge of electrical wiring or automotive repair. It is a great way to cut costs on your car stereo system. Check out the best method that can help you wire a car stereo system.
Things Required:
– Pliers
– Guide to removing the dash and speaker panels of your car
– 9 volt battery
– Utility knife
– Screwdrivers
– Wire cutters
– Small piece of sandpaper
– Wire strippers
– Amplifier wiring kit
– Electrical tape
– 6 feet 14 gauge speaker wire


Instructions
-
1
Learn about car stereo systems
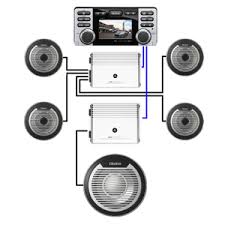
Understand the basics about all car stereo systems. Most contain four key components and the wiring connects them all. These components are the head unit, main speakers, subwoofers and the optional amplifier. Subwoofers are also optional but are thought to be present in a good quality system. You should also understand the different types of car speakers. There are normally four, two in the front and the remaining two in the back. Every speaker connects to the head unit through a pair of wires. Buy new speakers whenever installing a new head unit. -
2
Easy method of installation
Buy a car stereo wire harness which connects the present wiring for your previous head unit to your new one. Also, get an amplifier wiring kit which will consist of all the wires to get a signal and power to the amplifier along with six feet of 14 gauge speaker wire for the subwoofers. The speakers usually come with wires that you can use to connect them to the head unit. Get a guide to remove the door panels, dash and floor molding of the car. This can be found over the internet otherwise ask for a repair manual at some automotive stores. -
3
Wiring of the stereo
Remove the negative cable from the battery. In order to replace the speakers with new ones, start by removing the panelling of the speaker system. Connect the speaker wire to the old speakers with a metal clip and slide them to the new ones. Place the connectors to the new speakers. Be sure to put the negative wire to the negative terminal on the speaker and the positive wire accordingly. Screw the speaker and wait until the speaker enclosures is placed back to your new head unit.


