How to Create an Ombre Nail Design
While it might seem to be an effect that is difficult and complicated to achieve, an ombre nail design – also known as “fading,” or “gradient”, as it blends multiple colours together on a single nail – is actually surprisingly simple. You do not need to paint on your polishes, and work furiously with a toothpick to blend and swirl multiple colours together on your nails – instead, an easier method is available, in order to ensure that you get a perfect, foolproof result every time.
Things Required:
– Your choice of 3-4 nail polish shades
– Scotch tape
– Makeup sponges
– Base coat
– Top coat
– Nail polish remover
-Cotton swabs


Instructions
-
1
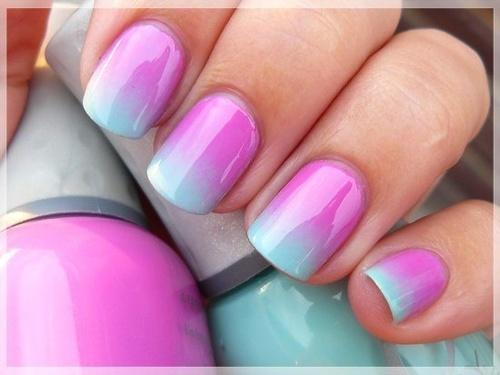
Start by choosing the shades you want to incorporate and blend on your nails. Make sure you choose no less than 3 or 4 shades, for a striking design, and try selecting colours that will work well together. You may, for example, choose pink, orange, and yellow, for a sunset design, or blue, green, and turquoise, for a look reminiscent of the ocean.
Image courtesy: glamour.com
-
2
Once you’ve selected the shades, it’s time to begin painting your nails. First, go through the regular processes of preparing your nails for polish – wash your hands, remove old nail polish, buff your nails, and push the cuticles back. Then, proceed to apply a thin, smooth base coat and allow it to dry completely.
-
3
Next, wrap tape around your fingers, just under your nails, all the while making sure it doesn’t cover any part of your nails. This will protect the skin on your finger from getting stained with excess nail polish as you work on creating your ombre nail design, and make the cleaning up process much easier.
-
4
Now, pick up the makeup sponge, and on the small end of the sponge, proceed to paint on layers of your preferred polish shades, in the order and style you want them. This will later be stamped on to your nails, so make sure it is exactly as you want it.
Image courtesy: glitterss.blogspot.com
-
5
After you are done painting the sponge, proceed to stamp it on one nail – press it against the surface of the nail, hold it for a minute, and move the sponge up and down slightly, to blend the colours and create a gradient effect. See if you like the result – if you do, go on and stamp all your nails, and if you don’t, make the desired adjustments and try again. If you want, you can stamp your nails multiple times, for a darker colour, but make sure you allow the polish to dry between stampings.
Image courtesy: fashion.ie
-
6
Once the colour is to your liking, and your nails have all dried, take off the tape. Dip a cotton swab into the nail polish remover, and clean up the sides of your nails, removing the excess polish that is left over after stamping. Finally, apply a thin, smooth top coat, and your ombre nail design is good to go.
Image courtesy: tumblr.com


