How to Install a Circuit Interrupter
A circuit interrupter is an automatically working switch that serves the purpose of protecting an electrical circuit from any electrical damage. The damage that the circuit can be exposed to is either overloading of electrical current or the phenomenon of short circuiting. The basic function of the device is to interrupt the continuity of the electrical circuit in a fault condition, and by disconnecting the connection, it saves the circuit and the appliances attached to it by protecting them from overloading and short-circuiting. The circuit breaker is different to a fuse as a fuse once blown, cannot be used for future protection while a circuit interrupter can be used over and over again by resetting.


Instructions
-
1
The first step for installing a circuit interrupter is to check the power supply to the electrical panel and turn it off. This can be done by disconnecting the main circuit breaker and setting it to the “Off” position.
-
2
The next step is to inspect the circuit breaker and check the breaker arrangement for unused locations.
-
3
Coming to the third step, you will have to remove the electrical panel cover. This will be done by removing the fasteners and a helper can then pull the cover by pulling it away from the holding panel.
-
4
Next in line is to test the panel for power. Testing can be done by setting the meter to the highest voltage range and checking the terminals via probes for the existence of power.
-
5
Now locate a space that has not been used before for the new circuit interrupter to be installed. The space that is to be made can be above below or between the existing circuit breakers.
-
6
Next you will have to select the correct circuit breaker that is required to achieve the purposes that are demanded. The manufacturer of the panel has listings for the approved breakers that they support along with their device, so choose one from that list.
-
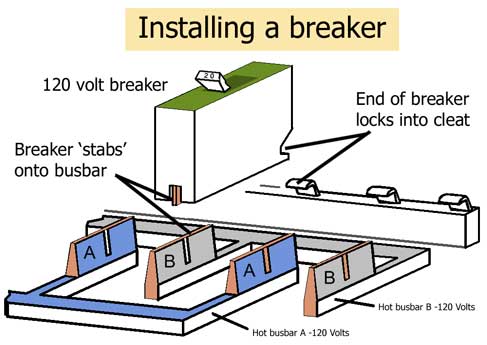
7
Locating the mounting points of the circuit breaker is the next step. Each breaker has two points and these two are mechanical junctures that require contact. These points are usually at the bottom of the breaker.
-
8
Now set the breaker’s handle to an off position.
-
9
Next is the installation of the breaker and it has to be done by aligning it with the unused space in the panel.
-
10
Now we have to connect the circuit that we disconnected earlier and then all foreign objects are to be removed from it. Install the cover of the breaker now and test the function.


