How to Install Ceramic Floor Tile
Ceramic tiles give any room a touch of elegance and class . They are easy to clean, durable and attractive and so are preferred by home owners as a floor option. Ceramic tiles come in different colors and designs giving you the choice to design your own floor plan. Installing ceramic tile floor yourself may seem a daunting task but with proper guidance and planning, you can save a lot of money. An added benefit is the sense of achievement that comes with doing something challenging yourself. We have made the task easier for you by setting out the process in a step by step form in the guide below.
Things you need:
– Cement backer boards
– Leveling compound
– Measuring tape
– Ceramic tiles
– High quality adhesive
– Grout
– Caulk
– Notched trowel
– Rubber float


Instructions
-
1
Prepare the sub-floor:
A sub floor of cement backer board is preferred as base for the tiles. These boards come in sheets and of 3 by 5 foot. This prevents the tiles from popping up.
Use a leveling compound over the floor to fill out spaces and cracks. This will give smooth base for the tiles so that they do not crack.
-
2
Room measurements:
You have to measure your room size in square feet. Use a tape measure to calculate the length and breadth of your floor. Say the floor has a length of 12 feet and a breadth of 7 feet. Multiplying these two numbers together for the area size gives you 84 square foot area.
-
3
Tile selection:
This area will help you determine the quantity of tiles you need to cover the floor. However, tiles are available in different sizes and so there is no fixed calculation for that. The main point is to divide the area of your floor with the area of one tile you are using. The result will be the quantity of tiles you need.
For example, If you are getting a tile size of 12 by 12 inch (1 by 1 foot), you will need 84 such tiles to cover the area. However, here you have to account for breakage and wastage. So it is advisable if you get 15% extra tiles. Like get around hundred tiles so that your work does not stop when you run out of tiles.
Choose tile colors and patterns of your choice. They should complement the theme of the room you are covering.
-
4
Finding the mid point:
The laying down process starts with finding the center point of the room. Draw a straight line from the center of 12 foot line to the apposite wall using a chalk. Draw another line from the center of 7 foot wall to the apposite one. The center point is where the lines intersect each other, at a 90 degree angle. Now your floor has four equal sized quadrants.
-
5
Practice session:
Start practicing the layout pattern without any adhesive. Work on one quadrant at a time. Lay out the tiles, starting from the center and extending towards the walls, leaving small spaces between the tiles. Do the same for all quadrants so that now your floor is fully covered with tiles without any adhesive. If any space is left between the last tile and the wall, see if you can introduce tiles of smaller sizes uniformly all around to cover it. If ideal sizes are not available, measure the area and cut the tiles to that size accordingly using a tile cutter. Once you are sure that you have mastered the pattern and can lay the tiles permanently, pick up the tiles and set them aside safely.
-
6
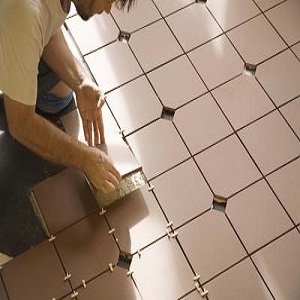
Laying down tiles:
Remove the tiles from the area. Use a notched trowel to spread the adhesive. Start laying down the tiles one by one as you continue spreading the adhesive. Do the same as the practice session i.e work on one quadrant first. Do not twist tiles. Just press them slowly so that they fit neatly. However, you need to use tile spacer for each tile so that there is a little space between each of them.
Continue doing this until you are done with all the quadrants and the floor is complete.
-
7
Grouting:
Leave the adhesive to dry for a day before progressing with the grouting. After the adhesive has dried, start grouting the joints, working in quadrants like before. Grout using a rubber float. Grout the spaces to a level where they are even with the height of the tiles. The grouting will leave a hazy print on your tiles. Clean this off with a damp sponge. The joints where the tiles meet the walls are best filled with caulk instead of grout. The caulk here will support expansion and contraction of tiles due to weather.


