How to Make Zebra Nails
Your nail color can give you a much needed extra pop. Tired of common nail prints? Let the animal inside you out. With just two shades of nail polish, you can create a print that is going to make every one within 1 km radius envious of you. Zebra nails are chic and can be done with a combination of any other color with black used for the stripes. Conventionally white is used for the base but people have been seen making amazing prints with colors like red and green combined with black. So grab the things needed and sit down to paint. Follow our guide below which breaks down the process for you into simpler steps.
Time required: Twenty minutes
Things you need:
– Top coat ( clear one)
– White nail polish
– Black nail polish
– Paint brush
– Nail polish remover to clear any spills
– Cotton ear bud


Instructions
-
1
Clean you hands and nails well. Wash with soap water and clean the nails with an old brush.

-
2
Dry your hands with paper towels. Apply a top coat of clear polish.

-
3
Let the top coat dry. In traditional polishes, the bottom coat is white. Apply 2-3 coats of white polish. You will have to wait between coats so that one is dry before applying another.

-
4
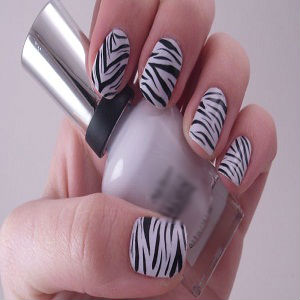
Dip the paint brush in the black polish and start drawing zebra lines on your nails once the white polish is dry. Leave some lines incomplete to give the zebra effect. For help you can keep a zebra print near you.

-
5
Apply a base coat again. Clear off any smudges on the tips and edges of your nails using a cotton bud dipped in nail polish remover.

-
6
The base color does not have to be white. It could be any other color like green as shown in the picture. Black on pink also looks gorgeous. Experiment with the colors and come up with your own killer combination.


- White nail polish
- Black nail polish
- Paint brush
- Nail polish remover to clear any spills
- Cotton ear budNext%20stop%3A%20Pinterest "Pin It")


