How to Replace Drawer Glides
Drawers that get stuck and do not open easily are certainly very irritating. The reason behind such drawers is mostly the glides which get worn out and are unable to provide a swift uninterrupted base to the drawers. Replacing drawer glides is a very simple and easy process that does not ask for much skills or time. Do it on a unoccupied afternoon or a long weekend and save yourself all the irritation that comes with blocked drawers. You are of course going to save on the fee of hiring a person to do the job. We have the complete process for you to go through.
Things you need:
– New drawer glides tool set
– ruler
– pencil
– screwdriver


Instructions
-
1
Take off drawers:
Take the drawers off the glides first. This usually requires lifting the drawer at a 45 degree angle and sliding it out. However, at times the end of the drawers may be secured with a latch or lock that prevent it from coming out all the way out. Unlock these. Take off the drawer and place it safely aside.
-
2
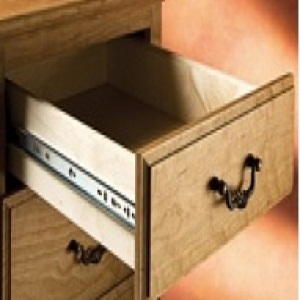
Release the old glides:
Use a screwdriver to take off the old glides. Work slowly and neatly without damaging the wood.
-
3
Measurement:
Use a ruler or an inch tape to measure both the length and width of the old drawer. Sketch on a paper if possible to take with you as a sample to take to the hardware shop for getting new glides.
As a precaution, take the measurement of the length of the drawer itself. Sometimes it is not possible to get the exact length of the old glides so you have to determine whether your drawer can do with longer ones.
-
4
Purchase new glides:
Take the sample or pair of old glides themselves to a hardware shop and look for replacement. While shopping online, take great care of the measurements.

-
5
Install new glides:
Most glides come with a manual of installation. Installation is a simple process. There is a left glide and there is a right glide. Make sure that you align the right side of glides with right side of drawer and left with left.
Use a screwdriver and the screws given in the kit to attach the glides inside the cabinet. You might have to drill in holes for the screws.The previous marks of the old glide might be of help while determining the position. Once the glides are installed, slide the drawers in.


