How to Replace Moulding and Repair Drywall Cracks
Moulds in drywall are a serious hazard for both health and structural integrtiy. They can result in sickness of some sort or in worse case scenarios even cause a wall to collapse. It is very important to repair it to maintain the safety of the home or any other building.
One method of containing these moulds is the use of bleach, but spraying it on the cracks does not solve the problem sometimes, as drywall which has mould on the outer surface can be much worse on the inside than it looks.
Moulding in a wall is a serious issue and must be fixed on an urgent basis. The remedy for curing moulds in the drywall is simple and it can be achieved in less than a day.
Take all precautionary measures before proceeding forward, as once you disturb the mould, spores will rise everywhere. Black mould is the most dangerous one of them all. Make the space airy and open all windows and doors in the vicinity. Make sure there are no children and pets present nearby, and also warn your immediate neighbours to close windows to prevent dust from getting in their homes.


Instructions
-
1
Put on the dust mask and don your protective gloves. Wear your work clothes, and use a hammer to rip out chunks of dry wall with mould present on them. After you have breached the outer covering of the wall, you should be able to locate the source of the problem. The cause may be something that you once repaired, and did not seal it completely.
-
2
You will have to fix the issue first before proceeding forward, or else mould will resurface again soon. If you are having problems locating the originating point, remember that moisture is the most common reason behind mould, so try to find from where does the water makes its way into the dry wall. It is a ‘dry wall’ and needs to remain dry to save it from degradation.
-
3
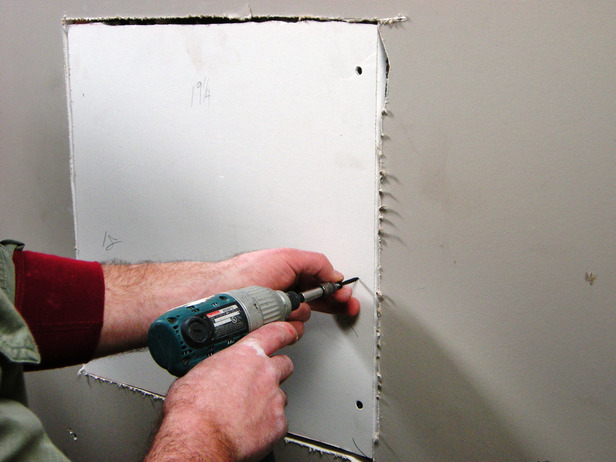
Use a dry wall planer to smooth the bulging pieces of the wall to make the entire surface flat for repair work. Expose the corners of the wall so that fixing studs on each side of the repair piece is made easier.
-
4
The aim behind the use of dry wall planer is to create a smooth rectangular region for the attachment of the repair piece.
-
5
Fix the new piece of dry wall to its area over the wall. Use your dry wall screws to fix the panel over the wall surface.


