How to Replace a Garbage Disposer
A garbage disposer shreds down leftover food so that it can pass through your plumbing system. A malfunctioning garbage disposer is surely a headache for that needs to be cured hurriedly for smooth operation sin the kitchen. You can replace the garbage disposer yourself within an hour without calling any external paid help. The process is very easy and all it demands is that you have the right tools and of course a replacement. However, before proceeding do ensure that your old disposer has really given up because at times disposers just get jammed and can be fixed easily. If you believe your disposer cannot be fixed and needs to be replaced, follow our step by step guide.
Things required:
– New disposer
– Screwdriver set
– Pipe wrench (smooth jaws)
– Plumbers tape


Instructions
-
1
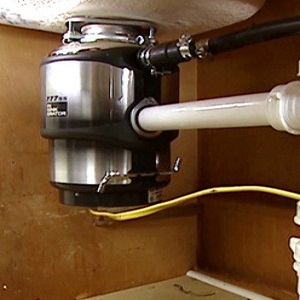
Removing old disposer:
Before starting, turn off the power to the disposer at the circuit breaker. Remove the dish washer drain tube by using the pipe wrench to loosen up the clamps. If your old disposer had a plug in electricity connection, simply unplug it. For others you have to pull the wires apart from the disposer after removing the safety cover. These wires will then be attached to the new disposer.
Use screw drivers to loosen the retaining ring that holds the disposer in place. Take off the disposer from its place.
-
2
Install new disposer:
Pick up the disposer and place it inside the retaining ring. Rotate around so that the disposer fits snugly. Use a screw driver to tighten the locks around it. Attach the drain tube to it using the pipe wrench. Use the pipe wrench to tighten the tube so that there are no leakages.
-
3
Power fittings:
Attach your disposer to the circuit by connecting the three wires. The white color wire is neutral, black is live and green is earth. Connect the wires by matching colors and securing them with wire nuts. However, garbage disposers where you just have to plug in into the switch are also available and you do not have to attach the wires in their cases. Secure the safety cover on the disposer and you are all set. Check for any leaks.

- Plumbers tapeNext%20stop%3A%20Pinterest "Pin It")


