How to Replace Rear Wheel Bearings on a BMX
The rear wheel of a BMX bicycle is integrated with ball bearings to reduce friction. These bearings enable the hub of the wheel to move as smoothly as possible and avoid producing much friction with the axle upon which it is mounted. Since BMX bikes are used in extreme sports and stunts manoeuvres, the rear wheel is put under more than usual stress and the bearings wear out over time. This will be indicated by a grinding sound from the rear wheel and you will have to replace the bearings.
Instructions
-
1
You have to take out the wheel from your BMX bike for replacing the bearings. Begin with inserting a freewheel removal tool through the rear cog and place it with the chain whip. Now use an adjustable wrench to rotate the removal tool in anti-clockwise direction to separate the cog.
-
2
You better place the removed wheel on a light-coloured piece of cloth so that you can detect any small part falling from it during the bearing replacement process.
-
3
Now put a 15mm cone-wrench on the non-drive side of the axle cone and then use the wrench to remove the locknut on the tip of the axle.
-
4
Once the locknut is unthreaded, take out the cone and the axle from the other side of the wheel.
-
5
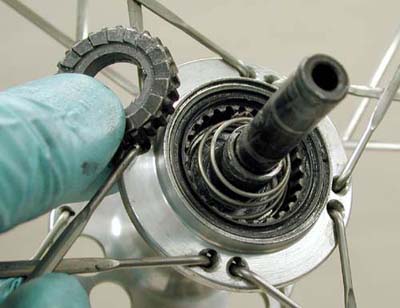
You can easily see the bearings when you remove the axle from the wheel. Take out the worn out bearings from both sides but you must count the number of bearing balls you have taken out from either side. The exact same number of new balls is to be put in afterwards.
-
6
Use an old towel to clean old grease from the axle.
-
7
Apply a new layer of grease within the shelf inside the hub of the wheel, where the bearings are places. It is also called the bearing race.
-
8
Purchase new bearings from a spare parts or hardware store and make sure to bring the same sized bearings, as any other size will not fit into the wheel.
-
9
Place the two bearings into the bearing race where you have applied grease earlier.
-
10
Apply a second layer of grease over the new bearings and the axle of the wheel.
-
11
Now without disturbing the bearings, carefully insert the axle from the drive side of the wheel.
-
12
Now thread the side cone and locknut in particular direction of the axle with your fingers.
-
13
Hold the side cone with one wrench and the locknut with the other. Stiff the locknut against the cone.
-
14
Now rotate the wheel to examine if it is moving more freely now than before. If you see the wheel is binding, you better loosen up the locknut slightly. If the hub moves the wheel side-to-side, you need to further tighten up the locknut.
-
15
Place the rear cog to its position with the help of the freewheel removal tool and tighten it up with the wrench.
