How to do Butterfly Nail Art Designs
The butterfly nail art designs are one among the most eye catching nail art designs. You can make wonderful butterfly designs with the help of multiple nail polish colours. As you know it takes hardly one or two minutes to remove the nail polish colours with the help of nail polish removers therefore you can rock every day of your glamorous life with unique butterfly nail art designs. Go through this article to get a clear idea how to do butterfly nail art designs and impress your friends, family members and colleagues. Butterfly nail art designs are simple and easy to make therefore you can do it from the comfort of your own home.
Things Required:
Nail polish colours
Cotton pieces
Sanitizer
Nail polish remover
Paper towel
Toothpicks
Nail art brushes


Instructions
-
1
Manicure your nails first. Remove the old nail polish if any and file your nails to give them a proper shape.
-
2
Push back the cuticles of your nails and wash your nails with a good quality sanitizer.
-
3
Dip cotton pieces in a nails cleaner and clean the surrounding of your nail plates.
-
4
Now you nails are all set to decorate them with beautiful butterfly nail art designs.
-
5
Now, select nail polish colours. For your butterfly nail art designs. You can use any of your favourite colours.
-
6
However, you can select pink and white nail polish colours, as they look very funky. In addition to that, you can make a combination of pink and blue which look perfect together. Let us take pink and blue to make butterfly nail art design.
-
7
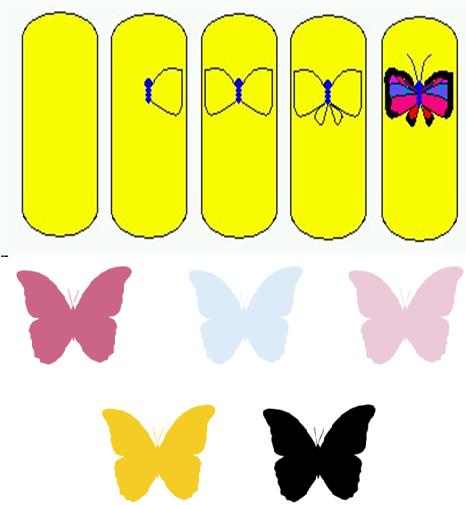
Apply any your favourite light base coat colour. Yellow nail polish will complement the funky colours like pink and blue.
-
8
Make three dots in the centre of your nails, one big to make the head of the butterfly along with two small dots for the body of the butterfly.
-
9
Now, load very small amount of black or white nail polish on the tip of you nail art brush and paint a fine line, starting from the main dot. Carefully curve the line into a shape of a wing and end it at the last dot in a row. Repeat the process on the other side for the second wing of the butterfly.
-
10
Now make an outline for two smaller wings under the main two wings, using black and red colour nail polishes.
-
11
Dip a toothpick in a black nail polish and add two thin swooping lines for the antennae of the butterfly.
-
12
Now, top coat your design with glitter to further enhance their overall look.
-
13
Top up you butterfly with different colours. However, you can decorate your butterfly with rhinestones for the body and rhinestones on the wings out there.


