How to Build a Stockade Fence
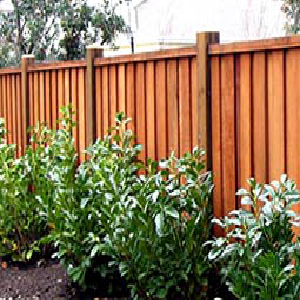
Want privacy from prying neighbors or a busy road? A stockade fence is the right choice and it is very popular among house owners. It does not only give you privacy but also helps in keeping your kids confined and containing your pets. It is a great addition to your landscape and it provides a good backdrop for your plants. Another benefit is that it is considerably cheaper than the iron fences and there are variety of options available. The project will take a very short time if you have a helper.
Things Required:
– Wood posts
– Concrete
– Nails or screws
– Horizontal fence supports
– Hammer or drill
– Vertical fence panels


Instructions
-
1
Start off by digging holes. Each hole should be around 3 feet apart and at least one foot deep. Once the holes have been dug, put in a significant amount of concrete into them and place the fence posts inside. Now allow the concrete to harden so that they become stable. After they are set, apply some pressure to check the firmness.

-
2
Now you are ready to nail 2 braces onto the inner portion of the edge along each of the posts. Make sure that the braces in the middle of the posts are all on the same level. One of the braces will be about one foot from ground and the second one should be approximately six inches below the top.

-
3
Attach support boards to each of the braces. They will help in bearing the weight of the heavy panels. Now align the tops of the stockade panels. Add each board separately and press them against each other. Repeat this practice between all posts. Usually no space is left between them to fulfill privacy purposes. An additional board could be needed in the front of the posts; this will give a blended and uniform look.


