How to Record Music in High Definition
If you are planning to record music in High-definition (HD), then you can use inbuilt Sound Recorder utility in each of the Windows XP, Windows Vista and Windows 7 operation systems. Here, you should have a good quality sound card installed in your computer, and a microphone should also be connected with your computer, which you will use to record the sound.
Once you are done with recording HD music, you can save it on your computer’s hard disk, and use it later, as per your needs. The Sound Recorder utility is really easy to use, and even a novice computer user can record sounds using this program.


Instructions
-
1
Purchase a good quality microphone from the market, as it plays key role in recording music in HD. Connect it with your computer, and adjust it using Volume Control Options from the Control Panel.
-
2
If you are using Windows XP, then open the “Start” menu and point your cursor over “Programs”. Now move your cursor to "Accessories," and point to “Entertainment”. From the list of options, click the “Sound Recorder”.
-
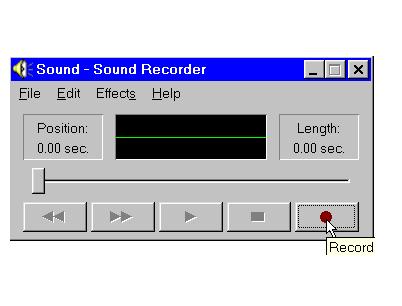
3
In the Sound Recorder dialog box, click the Record button, with Brown dot in the middle, to start recording audio. You can now sing or speak in the microphone, and your voice will be recorded. You can also play any music in the background, to have it added with your voice.
-
4
You can also play any music file from internet, or from your computer, and it will be recorded by the Sound Recorder.
-
5
Click the Stop button, with black box in the middle, to stop the recording process. If you want to resume the recording process, you can press the Record button once again.
-
6
Now open the “File” menu and click “Save As”. Now, you need to specify the location where you want your music file to be saved. Click “Save”, and you file will be saved in your computer’s hard disk.
-
7
If you are using Windows Vista or Windows 7, then you will have to open “Start” menu, and write “Sound Recorder” in the search field. You will now see the application in the search results. Click on it and the Sound Recorder dialog box will appear on your screen. The rest of the process is same, as you followed in Windows XP.
, then you can use inbuilt Sound Recorder utility in each of the Windows XP, Windows Vista and Windows 7 operation systems. Here, you should have a good quality sound card installed in your computer, and a microphone should also be connected with your computer, which you will use to record the sound.
Once you are done with recording HD music, you can save it on your computer’s hard disk, and use it later, as per your needs. The Sound Recorder utility is really easy to use, and even a novice computer user can record sounds using this program.Next%20stop%3A%20Pinterest "Pin It")


