How to Make a Flat Bow for Cards
One of the nicest ways to finish off a hand-made greeting card is with a ribbon bow. Colourful ribbon bows compliment hand-made cards perfectly. While you can find a variety of ribbon bows in the market, making your own bows at home is also a fun activity. Furthermore, making ribbon bows for your invitation cards at home is not only easy but also economical. You can use both single sided and double sided ribbons to tie perfect flat bows for your special greeting cards.
Things Required:
– Ribbon
– Scissors
– Glue
– Florist wire (thin gauge, only where needed)


Instructions
-
1
The first step in making homemade ribbon bows for cards is to choose the ribbon. Match the ribbon to the colour or theme of the cards. For example if it is an invitation for your baby girl’s first birthday, vibrant colours will work best, but if it is your son’s birthday it’s better to buy blue ribbons. Also decide the quality of the ribbons. Usually satin ribbons are used for making bows, but since it is very slippery you may find it hard to handle. Grosgrain makes an easier choice for novice bow makers.
-
2
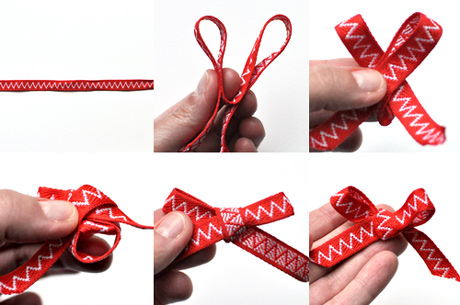
Hold the ribbon between your thumb and index finger and make a loop, making sure its cut end is on the top, under your thumb.
-
3
Wrap the ribbon around your thumb to form a small loop, and bring it round to the back.
-
4
Now give the ribbon a tight half-twirl close to where you are pinching the centre and push it through the central loop.
-
5
Gently pull both the loop ends of the bow to tighten the knot made at its centre. Also ensure that both tails of the ribbon bow are sitting flat, with the right side facing up. Adjust the size of the bow and length of the tails as well at this stage.
-
6
Once you are satisfied with the looks of your bow, pull tight and trim its open ends.
-
7
Apply the bow to your invitation card with the help of glue.
Next%20stop%3A%20Pinterest "Pin It")

