How to Make Skateboard Shelves
Everyone needs to create storage space to put things away, or to make their life more organized. People tend to clutter things around in their rooms, leaving them with very little to no space to maneuver in and this tends to cause a lot of problems.
However, there are a number of ways to fix this problem and get your room organized and good to go. One of these ways is to go on and introduce shelves in your rooms.
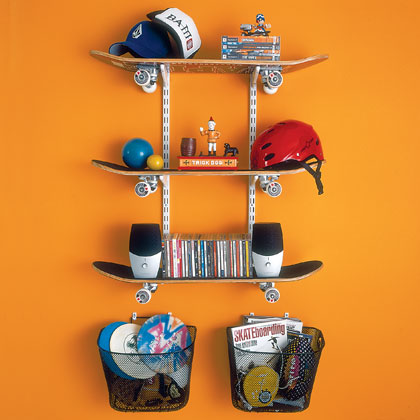
Shelves are great and tend to create ample storage space for you. However, in order to have a rather unique shelving area, you could potentially go on and recycle skateboards and use them as shelves.
This will not only make your room look a whole lot better, but it will also be a very effective way of getting things done.


Instructions
-
1
Measure
The first thing you need to do is measure the distance between the wheels on the board. Once you have measured this distance, you need to on and mark it out on the wall.
After having marked it out on the wall, you can go on and drill in your support system for the shelving unit into the wall. After sticking in the base into the wall, you can attach the extensions that will hoist your boards. -
2
Brackets
Next up you need to go on and insert the brackets into the extensions that you have attached. You need to space the brackets so that each board can be placed into position comfortably, and so that there is enough space to place items on the boards as well.
A smart way to go about this would be to separate the boards with about one foot separating them from each other vertically. -
3
Attach board
The next step is to attach the board onto the bracket. First you need to go on and place the board on the bracket. This will show you just where the bracket meets the board. Mark this spot and drill a hole in the board.
Now you need to screw in the board to the bracket via the hole that you have just drilled.
After doing so, go on and secure the board in place. -
4
Check
The last thing you need to do is to make sure that the board is secured firmly. This is important since you don’t want it to fall over.
You can then clean up the board and make sure it is visually appealing before you start to use it.


