How to Install Solid Closet Shelves
Organization is a key factor for living a happy life. Your room is the best presentation about your organizational skills. Closet shelves provide a good way of organizing things in your room. With an intelligently installed shelves system, you can make use of all the space in the closet area. You might not be very good at crafting wooden shelves but you will find it easy to install the closet shelves on your own after reading this article. A well thought out plan is required to install the closet shelves before getting started.
Make a difference in your room and install the shelves in your own way. Follow the guide given below on how to install solid closet shelves and modify your room the way you want to.
Supplies and Materials:
– Nail Gun
– Nails
– Measuring Tap
– Pencil
– Note Pad
– 1 bucket of Primer Paint
– Paint Brush
– Large Plastic Sheet
– Wooden boards


Instructions
-
1
Taking Measurements:
Our first step is to take measurements so firstly, observe the area where you want to install your closet shelves and measure its height, width and length with a measuring tape. Keep a note pad with you and keep on recording the measurements side by side. While taking the measurements leave some room for the dividers where needed.
-
2
Making a Layout:
Now that you have recorded the measurements, it’s time to plan out a rough sketch in your mind. Then think about how many shelves you want, keeping in mind how much distance you want between each shelf. Normally the closet shelves are about 12 inches apart.
In the end, draw a rough sketch on a piece of paper.

-
3
Cutting the Wooden Boards into strips and shelves:
The next thing is to go at the hardware shop and get wooden boards cut into the desired width and height. Also get the 1x2 strips cut as well, this will give support to the shelves when installed.

-
4
Painting the wooden strips and shelves:
It is time to paint wooden strips and shelves. Choose the color of the paint that best goes with your closet. Now spread a plastic sheet in your garage and place all the wooden boards and 1x2 strips on it and apply the paint. Once the paint is dried from one side apply it on the other side and again leave them to dry.

-
5
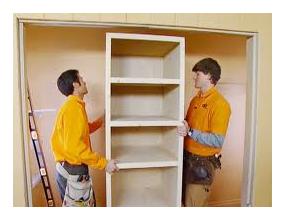
Installation:
With the help of a pencil, mark the points where the wooden strips and shelves are going to be installed.
Now before installing the wooden strips, it’s recommended to insert the shelves into the closet area or otherwise if you installed the strips first you might not be able to insert the wooden shelves in the closet area later.
Finally when all the wooden strips are nailed on the marked points, fix and nail the wooden shelves on every strip. Bravo! You have installed the closet shelves successfully!


