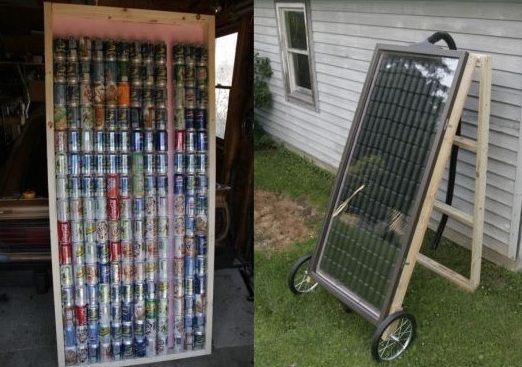
How to Build a Solar Panel from Soda Cans

Making solar panels for energy production is one of the best ways to reduce energy bills. Generally, solar panels cost a huge sum of money. However, it is possible to make a fairly inexpensive solar panel at home using soda cans.
Things Required:
– 2 x 4 wood scraps
– Nails
– Plywood sheet or plywood scraps
– 50 soda cans (aluminium cans)
– Tube of adhesive caulk
– Dark coloured paint
– Plastic tubing (vacuum cleaner tubes work great)
– Plexiglas
– Electric drill
– ¾ inch drill bit
Instructions
-
1
Out of the 50 soda cans, make holes in the bottom of 45 cans with an electric drill attached with ¾ inch drill bit. For the rest of the 5 cans, make holes in the side near the bottom of the cans. Make five rows of 10 cans each, gluing 9 cans with holes in the bottom onto one soda can with hole in the side for each row. Use the adhesive caulk for this purpose.
-
2
Make a box using 2 x 4 wood scraps. The inside dimensions of the box should be 50 by 12.5 inches. Attach a piece of plywood sheet cut to the right size or plywood scraps at the back of the box. Cut a piece of Plexiglas, same size as the plywood.
-
3
Paint of the 5 soda can stacks with dark-coloured paint such as black. Allow enough time for the paint to dry completely. Use the same paint for painting the inside of the box that you had made earlier.
-
4
Drill two holes size of the tubing in the box; one at the top and one at the bottom. Glue the soda can stacks into the box using adhesive caulk. Be sure to keep the soda cans with holes on the sides towards the bottom of the box.
-
5
Insert tubing through each of the soda cans and secure it using adhesive caulk. Affix the Plexiglas onto the front of the box to form the solar panel’s cover.
-
6
Determine which room you would like to heat using the solar panel and drill two holes in the wall that gets most sunlight; one down low and other at the top height with respect to the planned position of the solar panel. Insert the open tubing ends through these holes and seal them to complete the task.


