How to Make Construction Paper Crafts
Many people get stuck at home especially during rain or snow and they spend their time doing different things. Usually it is only a few people that make this time more productive. For such people, making construction paper crafts is something of a hobby.
Making construction paper crafts is a fun way to spend some spare time and get your kids involved as well. There are many different things that you can make from construction paper like frames, holders and other decorative items. However, you need to follow a few things for completing this task effectively. If you have not made construction paper crafts before and do not know how to do it, then follow some of these simple methods to help you get started.
Things Required:
– Construction paper
– Mat Board
– Craft knife
– Scissors
– Pen
– Glue
– Decorative fabric or paper


Instructions
-
1
First, you should decide which shape and size you want to make the construction paper frame. Then take a mat board and trace a rectangle on it by using a pencil and ruler.
-
2
You can give a heart shape to the frame or you can make a complete family tree for displaying the photo of your whole family. Both shapes are quite easy to draw.
-
3
Now you should take a craft knife for cutting the mat board. Make sure you do not hand over the knife to children as they won’t be able to cut it effectively and can also get hurt with the sharp edge.
-
4
Then take some construction paper and place it on the mat board, which you have already cut. Now you should trace the shape on the paper and use scissors for cutting it out.
-
5
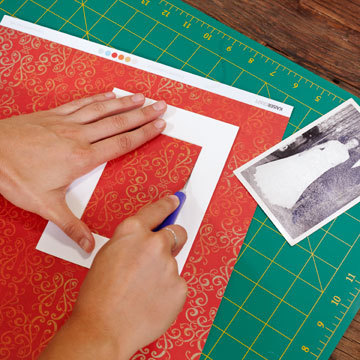
After that, select the spaces for pasting pictures. Then take the craft knife and cut these spaces cleanly. Make sure you cut it after taking the proper measurements of the pictures.
-
6
Now you need to decorate this construction paper by using different decorative papers, ribbons, or drawings for giving it an artistic touch.
-
7
You should cut a few squares of construction paper and tape three sides of these squares on the board leaving the top side open for inserting the pictures.
-
8
It’s time to line up the construction paper on the mat board and paste it by using glue. You can also glue ribbon on the edges of paper which will make it look beautiful.
-
9
For supporting the frame, you should cut a rectangle from the board and glue the small part behind the picture frame. Decorate the frame with drawings or with other decorative items.


